TL;DR
- Crushing Hand’s circular AoE outperforms Quill Volley’s cone pattern for multi-target efficiency
- Measured Ravager synergy enables superior mobility and vigor generation across all content
- Rod of Kepeleke and Banished Lord’s Talisman create guaranteed overpower critical strikes
- Spirit Glyph first placement maximizes survivability through life scaling
- Proper rotation maintains barrier uptime while optimizing damage output
Welcome to the definitive Crushing Hand Spiritborn build guide for Diablo 4! This powerful setup revolutionizes your damage efficiency and survivability, making it the optimal choice for nearly all game content. Whether you’re progressing through campaign or tackling endgame challenges, this comprehensive guide reveals why Crushing Hand surpasses Quill Volley and how to maximize your Spiritborn potential.
This build excels through intelligent skill synergies that transform your combat effectiveness. You’ll discover how to leverage circular area damage, enhanced mobility, and strategic resource management to dominate any encounter. The combination of accessible gear requirements and high performance ceiling makes this an exceptional choice for both new players and seasoned veterans seeking to optimize their Diablo 4 experience.
Understanding why Crushing Hand outperforms Quill Volley is crucial for maximizing your effectiveness. The fundamental differences in area coverage and targeting mechanics create distinct advantages in various combat scenarios.
• Circular Area of Effect: Unlike Quill Volley’s forward-facing cone pattern that requires precise enemy positioning, Crushing Hand delivers 360-degree damage coverage. This eliminates the need for constant retargeting and ensures consistent damage application against surrounding threats. The circular pattern proves particularly effective in dense enemy packs and chaotic battlefield situations where directional awareness becomes challenging.
• Synergy with Measured Ravager: This powerful combination enables seamless teleportation between enemy groups while maintaining continuous damage output. The mobility enhancement significantly improves build fluidity, especially beneficial for console players where precise targeting can be more demanding.
• Lower Gear Requirements: Crushing Hand achieves peak performance with fewer specialized items compared to Quill Volley builds. This accessibility allows players to reach competitive performance levels without extensive farming for perfect Diablo 4 equipment rolls.
Common Mistake to Avoid: Many players underestimate the importance of positioning with circular AoE skills. While less dependent on precise aiming, optimal placement still dramatically increases your damage efficiency by ensuring maximum enemy contact with the damage area.
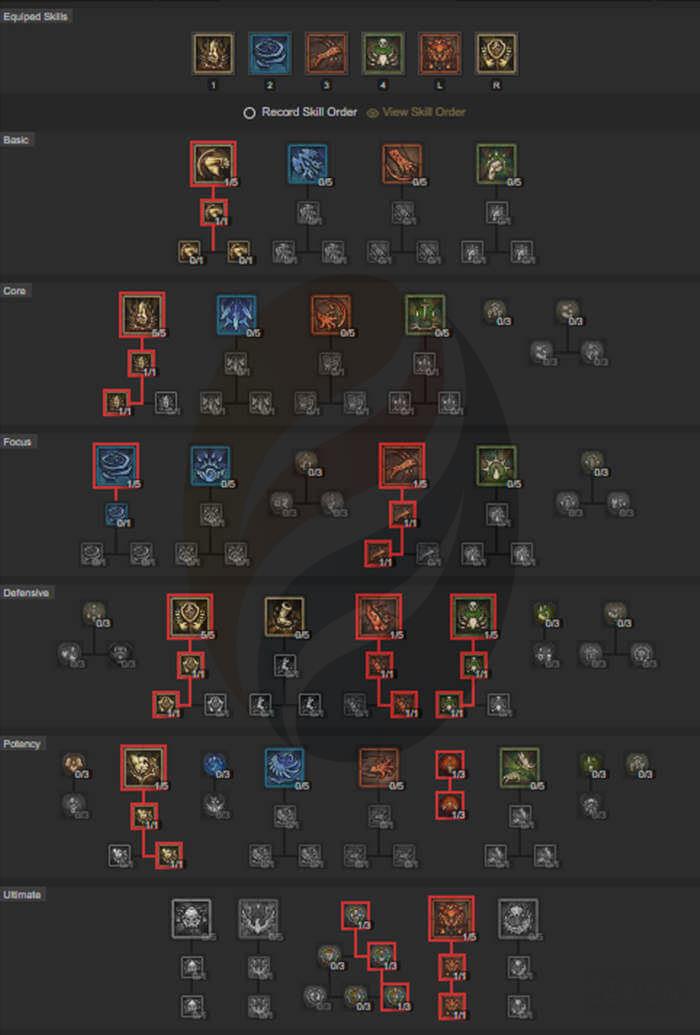
Mastering the Crushing Hand Spiritborn build requires deep understanding of its core mechanics and how they interact to create synergistic effects. Each component serves multiple purposes within the overall combat ecosystem.
• Crushing Hand: Your primary damage-dealing skill creates a powerful circular area explosion that scales exceptionally well with overpower modifiers. The skill’s inherent area coverage minimizes positioning errors while maximizing damage potential against grouped enemies.
• Measured Ravager: This enhancement transforms your mobility while dramatically boosting vigor generation. The teleportation component not only positions you optimally but also triggers additional combat benefits through movement-based synergies.
• Enhanced Crushing Hand: The additional 30% barrier generation significantly reduces dependency on specialized defensive gear. This defensive layer allows you to focus more offensive stat allocation while maintaining survivability.
Advanced Optimization Tip: Seasoned players can maximize efficiency by timing Crushing Hand casts immediately after Measured Ravager teleports, leveraging positional advantages while the barrier protects during skill animations.
Strategic gear selection forms the foundation of this build’s exceptional performance. Each piece contributes to specific aspects of your combat capability while creating multiplicative damage scaling.
To optimize this build, prioritize the following gear and aspects:
• Rod of Kepeleke: This essential weapon guarantees overpower critical strikes, creating massive damage spikes that quickly eliminate high-priority targets.
• Banished Lord’s Talisman: Delivers substantial overpower damage amplification that synergizes perfectly with your primary skill mechanics.
• Aspect of Redirected Force: Converts block chance into critical strike damage, creating defensive-offensive synergy that scales exceptionally well with gear progression.
• Ring of the Midnight Sun: Provides crucial cooldown reduction that enables more frequent skill usage and maintains optimal combat rhythm.
• Boots with Duelist’s Aspect: Maximum Life enhancement ensures survivability while scaling with your damage output through various mechanics.
• Pants with Aspect of Interdiction: Increased Maximum Resolve Stacks bolster your resource management capabilities.
• Gloves with Aspect of the Moonrise: Additional ranks to Crushing Hand directly amplify your primary damage source.
• Shroud of False Death: The 800 Maximum Life bonus significantly increases your effective health pool while synergizing with life-based damage scaling.
• Harlequin Crest: Another 800 Maximum Life addition that stacks multiplicatively with other health bonuses.
Gear Progression Strategy: Focus initially on obtaining Rod of Kepeleke and Banished Lord’s Talisman, as these create the core damage engine. Secondary items can be acquired progressively as you tackle higher difficulty content.
Your Paragon board development strategy dramatically impacts late-game performance. Proper glyph selection and placement create exponential scaling effects that separate competent builds from exceptional ones.
• Spirit Glyph: Position this glyph first to substantially boost your maximum life pool. The life scaling not only improves survivability but also enhances damage output through various overpower and life-based modifiers.
• Hubris Glyph: Critical for expanding your maximum resource capacity, enabling more frequent skill usage and maintaining optimal combat tempo.
• Exploit Glyph: Applies vulnerability to enemies, creating a separate damage multiplier that stacks with your other damage enhancements.
• Execution Glyph: (Additional recommendation) When facing elite enemies and bosses, this glyph provides execute damage that quickly finishes high-health targets.
Board Optimization Insight: Advanced players should prioritize rare nodes that provide both defensive and offensive benefits, particularly those scaling with maximum life or resource capacity.
Common Paragon Mistake: Many players spread their points too thinly across multiple boards. Instead, focus on maximizing key glyphs and rare nodes within your primary board before expanding to secondary options.
Executing the Crushing Hand Spiritborn build effectively requires mastering a specific combat rotation and tactical approach. Proper execution transforms this from a capable build into an exceptional one.
1. Engage with Ravager: Maintain constant uptime on this ability for optimal vigor generation and mobility. The teleportation component should be used both offensively for positioning and defensively for evasion.
2. Use Crushing Hand: Spam this primary skill continuously to maintain damage pressure while leveraging its circular area coverage against multiple targets.
3. Activate Armored Hide: Deploy this defensive ability strategically to gain significant block chance during high-damage phases or when positioned aggressively.
4. Utilize Soar: Employ this mobility tool for both engaging enemy packs and disengaging from dangerous situations.
5. Resource Management Cycle: (Advanced tactic) Monitor your vigor levels and time aggressive rotations when resources peak, while using defensive positioning during regeneration phases.
Positioning Strategy: Ideal positioning involves maintaining mid-range distance where your circular AoE reaches maximum enemies while allowing reaction time for defensive maneuvers.
The Crushing Hand Spiritborn build represents a powerful and exceptionally versatile setup that excels across all game content from early progression to maximum difficulty endgame challenges. The intelligent combination of circular area damage, mobility enhancements, and strategic resource management creates a playstyle that remains effective and engaging throughout your Diablo 4 journey.
With proper gear optimization and execution of the recommended strategies, you’ll effortlessly progress through Torment difficulties while confidently tackling any content the game presents. For those seeking to expand their tactical knowledge further, our Complete Guide offers additional strategic insights that complement this build’s philosophy.
Remember that mastery comes through practice and adaptation. As you become more comfortable with the rotation and mechanics, you’ll discover additional optimizations and personal preferences that further enhance your performance. Happy hunting!
Action Checklist
- Acquire Rod of Kepeleke and Banished Lord’s Talisman for core damage engine
- Practice Measured Ravager teleportation timing with Crushing Hand follow-up
- Implement Spirit Glyph as first Paragon placement for life scaling
- Master combat rotation: Ravager → Crushing Hand spam → Armored Hide → Soar
- Optimize positioning for maximum circular AoE effectiveness
No reproduction without permission:GameCDjnh » Crushing Hand Spiritborn Build Guide for Diablo 4 Master the Crushing Hand Spiritborn build with superior AoE efficiency, gear optimization, and advanced gameplay tactics