TL;DR
- Touch of Death is your primary spam skill requiring constant resource management
- Ravager engagement into Armored Hide defense creates optimal combat initiation
- Prioritize cooldown reduction and resistance stats for maximum uptime
- Paragon points should focus on glyph effects, legendary nodes, and life cap
- Proper skill rotation and positioning are crucial for surviving high-level content
The Spiritborn Touch of Death variant has emerged as one of Diablo 4’s most dominant builds, combining explosive damage potential with remarkable survivability. This comprehensive guide provides advanced strategies to master the intricate mechanics and optimize your performance across all game content.
This high-skill-cap build demands precise resource management and positioning awareness to unleash its full devastating potential against both elite enemies and massive hordes.
Touch of Death: Functions as your primary damage engine, delivering massive burst damage when properly sustained. The critical success factor involves maintaining consistent spirit generation through proper skill sequencing and gear optimization.
Ravager: Your essential engagement tool that rapidly closes distance while providing substantial offensive and defensive bonuses. Time this skill to maximize uptime on damage buffs.
Armored Hide: Maintain permanent uptime on this defensive ability for consistent damage mitigation. The damage reduction stacks multiplicatively with other defensive layers.
Scourge: Exceptional area-of-effect clearing capability that simultaneously damages enemies and restores your health pool. Position this skill to hit maximum targets for optimal healing returns.
The Hunter: Strategic mobility skill that enables rapid repositioning while amplifying your damage output. Use during vulnerable phases to maintain offensive pressure.
Vortex: Crowd control ability that groups enemies for efficient elimination. Combine with area damage skills for maximum clear speed efficiency.
Advanced Skill Rotation: Begin with Ravager engagement, immediately activate Armored Hide, group enemies with Vortex, then alternate between Touch of Death and Scourge based on resource availability.
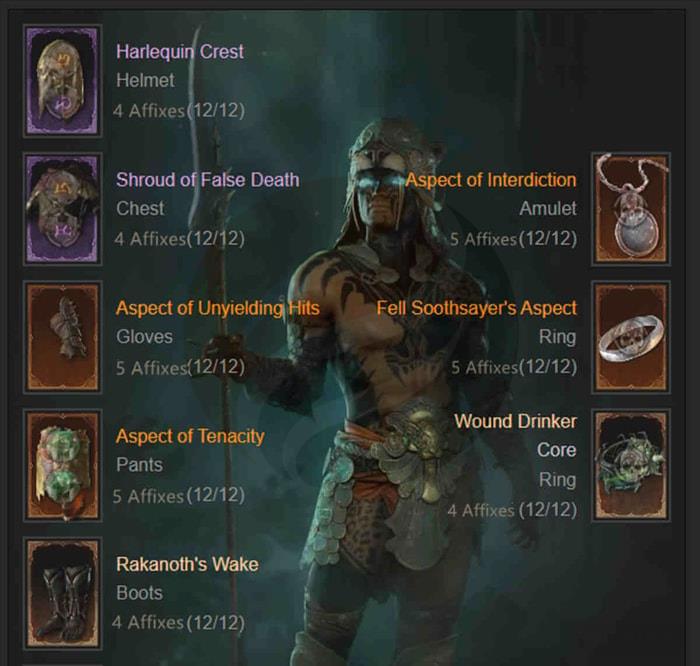
Helm
• Harlequin Crest: This legendary Diablo 4 helmet significantly boosts defensive capabilities while increasing maximum life and resource generation, creating a foundation for sustained combat.
Chest Armor
• Shroud of False Death: Essential chest piece that provides substantial damage amplification on your next attack after entering stealth mechanics.
Gloves
• Aspect of Unyielding Hits: These specialized gloves dramatically increase critical strike damage potential, synergizing perfectly with high-attack-speed setups.
Pants
• Aspect of Tenacity: Defensive pants that provide both dexterity for skill enhancements and maximum life for survivability scaling.
Boots
• Rakanoth’s Wake: Mobility-focused boots that offer crucial cooldown reduction and elemental resistance stacking.
Weapon
• Rod of Kepeleke: Your primary weapon choice that directly amplifies Touch of Death damage through specialized affixes and legendary power interactions.
Amulet
• Aspect of Interdiction: Versatile amulet that provides balanced improvements to both defensive capabilities and offensive power through multiplicative stat bonuses.
Ring Slots
• Fell Soothsayer’s Aspect: Enhances cooldown reduction efficiency while substantially increasing your maximum life pool for endgame content.
• Wound Drinker: Specialized ring that provides significant damage reduction against poisoned enemies, crucial for certain nightmare dungeon affixes and elite encounters.
Spirit Enhancements
• Gorilla Spirit Hall: Defensive spirit option that dramatically improves survivability through additional defensive stat allocation and damage reduction mechanics.
• Jaguar Spirit Hall: Offensive spirit choice that boosts ferocity stack generation, directly increasing your overall damage output in Diablo 4’s most challenging content.
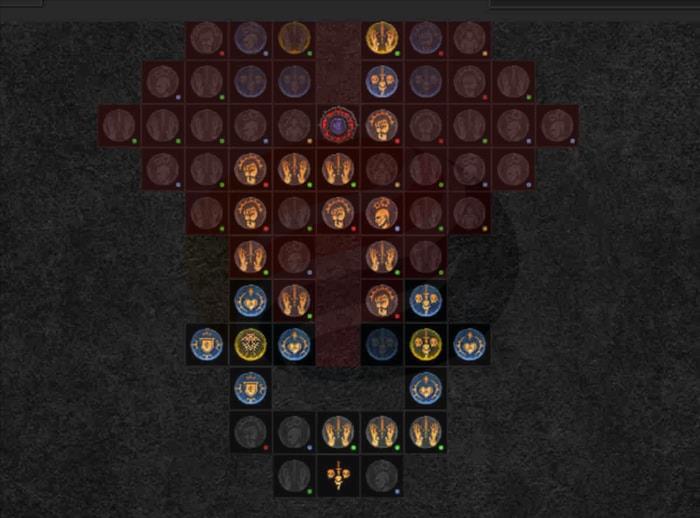
Early Game Paragon Strategy: During initial progression phases, limited Paragon points necessitate prioritizing glyph effect activation and strategic point allocation across [glyph effect] [legendary node] [life cap] for optimal power spikes.
Mid to Late Game Adjustments: As you accumulate additional Paragon points, gradually expand into secondary legendary nodes while maintaining focus on core survival statistics.
Resistance and Armor Allocation: Customize remaining point distribution between total resistance and armor values based on your specific gear choices and content requirements.
Advanced Glyph Placement: Position glyphs to maximize their radius coverage of rare and magic nodes, significantly amplifying their effectiveness through proper board planning and path optimization.
Optimal Engagement Sequence: Initiate combat with Ravager to close distance, immediately followed by Armored Hide activation to establish defensive layers before committing to damage rotation.
Resource Management Phase: Carefully monitor spirit levels to ensure Touch of Death can be consistently spammed during critical damage windows against priority targets.
Positioning and Mobility Execution: Utilize The Hunter dash strategically to reposition during enemy attack animations while maintaining offensive pressure through proper ability timing.
Crowd Control Integration: Deploy Vortex to cluster enemies efficiently, then follow with Scourge for simultaneous damage dealing and health sustain against grouped targets.
Advanced Combat Techniques: Master animation canceling between skills to maximize damage per second output while minimizing vulnerable exposure periods during elite encounters.
Resource Management Errors: The most common failure point involves insufficient spirit generation planning, resulting in extended periods where Touch of Death cannot be activated during crucial combat phases.
Defensive Layer Neglect: Many players underestimate the importance of maintaining Armored Hide uptime, leading to preventable deaths in high-tier nightmare dungeons.
Positioning Mistakes: Poor positioning often results in being overwhelmed by enemy density, negating the build’s survivability advantages through unnecessary damage intake.
Advanced Optimization: For players pushing greater rifts, focus on perfecting skill rotation fluidity and anticipating enemy movement patterns to pre-position Vortex pulls effectively.
Endgame Adaptation: Adjust your skill timing and resource expenditure based on specific dungeon affixes and elite compositions for maximum efficiency clears.
The Touch of Death Spiritborn build represents one of Diablo 4’s most powerful specialized setups, offering exceptional damage potential when mastered. Through diligent practice of the strategies outlined, you’ll dominate the game’s most demanding challenges with precision and power.
Action Checklist
- Acquire core legendary items: Harlequin Crest, Rod of Kepeleke, Shroud of False Death
- Practice basic skill rotation: Ravager → Armored Hide → Vortex → Touch of Death spam
- Configure Paragon board with priority on glyph effects and legendary nodes
- Master advanced techniques: animation canceling and pre-positioning
- Optimize resistance and armor values based on current gear progression
No reproduction without permission:GameCDjnh » Unleashing the Touch of Death: A Comprehensive Guide to the Spiritborn Build in Diablo 4 Master the devastating Touch of Death Spiritborn build with advanced strategies and gear optimization