TL;DR
- Valorant requires specialized removal due to Vanguard’s kernel-level anti-cheat system
- Always uninstall Vanguard before removing Valorant to prevent system conflicts
- Complete removal involves both program uninstallation and manual file cleanup
- Monitor system performance improvements after removal for verification
- Consider alternative competitive shooters that use less intrusive anti-cheat systems
When competitive fatigue sets in or privacy concerns arise regarding Valorant’s security infrastructure, many players seek comprehensive removal guidance for 2025. The process demands careful execution to eliminate all associated components from your system completely.
Unlike conventional game uninstallations where dragging icons to recycle bin suffices, Valorant presents unique challenges. The primary complication stems from Vanguard, Riot Games’ proprietary anti-cheat technology that integrates deeply with your operating system. This fundamental difference necessitates a methodical approach to ensure clean removal.
Vanguard operates at kernel level (Ring 0), granting it equivalent privileges to core operating system drivers. This elevated access allows continuous background monitoring but has generated significant community debate about system security and privacy implications. Understanding this architecture is crucial for successful removal.
Before initiating removal, assess your reasons for uninstalling. Competitive burnout, system performance concerns, or transitioning to other titles like Battlefield 6 all require slightly different approaches to ensure optimal outcomes.
Initiate the removal sequence by properly closing all Riot Games applications. Ensure both Valorant and the Riot Client are completely terminated through Task Manager to prevent conflicts during uninstallation.
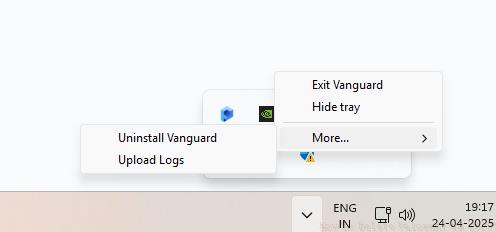
Navigate to your system tray by selecting the upward-facing arrow on your taskbar’s right side. Locate the Vanguard icon, which typically appears as a gray shield symbol. Right-click this icon to access the context menu, then hover over “More” options to reveal additional commands.
Select the uninstall option from the extended menu. The system will prompt for administrator permissions—grant these to enable complete removal. Monitor the progression indicators to ensure successful deletion.
For systems where the tray method fails, alternative approaches include using Windows Settings’ Apps functionality or third-party uninstaller software. These methods provide additional verification of complete removal.
Common mistakes include insufficient permissions, incomplete application closure, or attempting Valorant removal before Vanguard. These errors can leave residual files that may impact system performance or conflict with future installations.
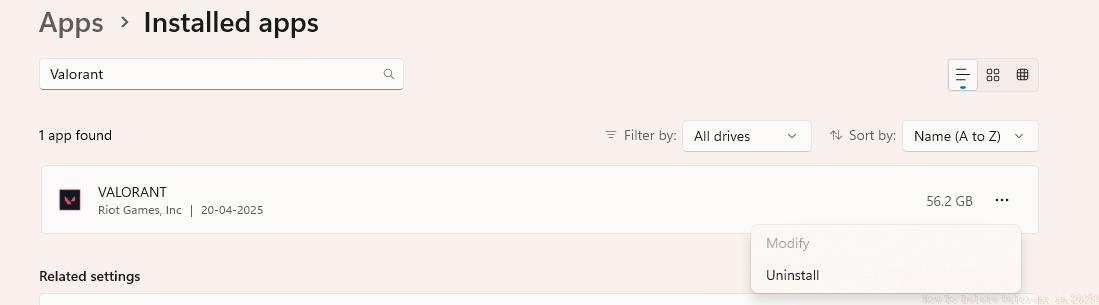
With Vanguard successfully eliminated, proceed to Valorant’s main application removal. Access Windows Settings via Start menu or keyboard shortcut (Windows key + I), then navigate to Apps > Installed Apps section.
Locate Valorant in your applications list—consider sorting by installation date for quicker identification. Select the application and choose Uninstall, confirming any subsequent prompts. The process typically requires 2-5 minutes depending on your storage drive speed.
Post-uninstallation, conduct manual cleanup of residual files. Navigate to common game directories including Program Files, AppData Local and Roaming folders, and Documents sections. Delete any remaining Riot Games or Valorant folders to reclaim storage space.
Advanced users may additionally remove registry entries using regedit, though this step carries risk if performed incorrectly. Always create system restore points before registry modifications.
Verification involves checking system performance metrics and ensuring no background processes related to Riot Games remain active in Task Manager. This comprehensive approach ensures complete removal.
Encountering removal obstacles requires specific troubleshooting approaches. For stubborn installations, boot into Safe Mode to eliminate background process interference. This method proves particularly effective for kernel-level components resistant to standard removal.
System performance typically improves post-removal, with noticeable gains in boot times, background resource allocation, and overall responsiveness. Monitor these metrics using built-in Windows performance monitors to quantify improvements.
When transitioning to alternative competitive titles, consider games with less intrusive anti-cheat systems. Research options thoroughly—some modern shooters balance security with user privacy more effectively. The BF6 weapons system offers compelling alternatives for tactical gameplay enthusiasts.
Future considerations include understanding that reinstalling Valorant requires repeating the complete Vanguard installation process, including system restarts. Weigh this commitment against your gaming preferences.
For players interested in different tactical approaches, exploring BF6 class mechanics provides fresh strategic dimensions while avoiding kernel-level anti-cheat concerns.
Action Checklist
- Close Valorant and Riot Client via Task Manager
- Uninstall Vanguard via system tray with admin rights
- Remove Valorant through Windows Settings Apps
- Manually delete residual files from Program Files and AppData
- Verify removal through Task Manager and performance monitoring
No reproduction without permission:GameCDjnh » How To Delete Valorant in 2025? Complete 2025 guide to safely uninstall Valorant and Vanguard anti-cheat with step-by-step instructions