TL;DR
- Establish 4-4 party split with tanks/melees and healers/ranged pairs
- Master Soul Reaping patterns and store mechanics for later phases
- Coordinate tower soaking and laser dodging during Grand Cross
- Handle role-specific challenges in solo add phase efficiently
- Execute final mechanics with proper positioning and mitigation timing
Conquering The Ageless Necropolis (Extreme) in Final Fantasy XIV Patch 7.3 requires meticulous party organization from the outset. This challenging encounter against Necron demands precise positioning and role coordination to overcome his devastating mechanics. Understanding these foundational setups will significantly improve your party’s consistency and success rate throughout the battle.
Light Party Structure: Implement the standard 4-4 division, creating two balanced groups that will handle various mechanics throughout the fight. Each light party should contain a mix of roles to ensure proper handling of partner-based and group-wide mechanics. Pro Tip: Designate one light party as “Group A” and the other as “Group B” for clear communication during complex sequences.
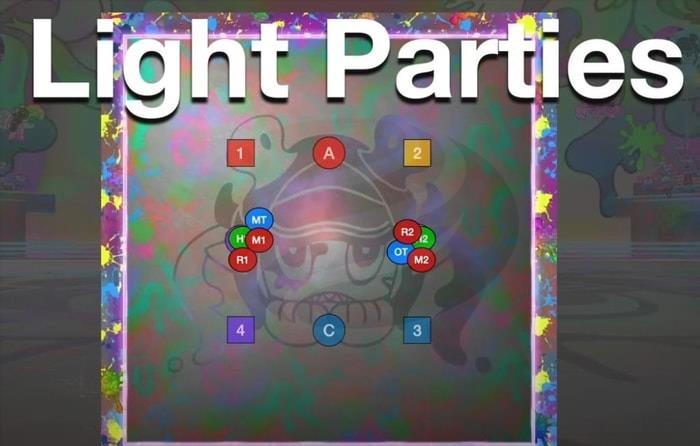
Role Pairing Strategy: Pair tanks with melee DPS and healers with ranged DPS. This arrangement optimizes mitigation coverage and ensures proper handling of proximity-based mechanics. Common Mistake: Avoid pairing both tanks together or both healers together, as this creates vulnerability gaps during critical moments.
Spread Formation: Position players in the sequence: tank, melee, melee, tank, range, healer, healer, range (left to right). This formation provides optimal spacing for baiting line AoEs and handling spread mechanics. Advanced Tip: Practice this formation during downtime to build muscle memory for rapid positioning.
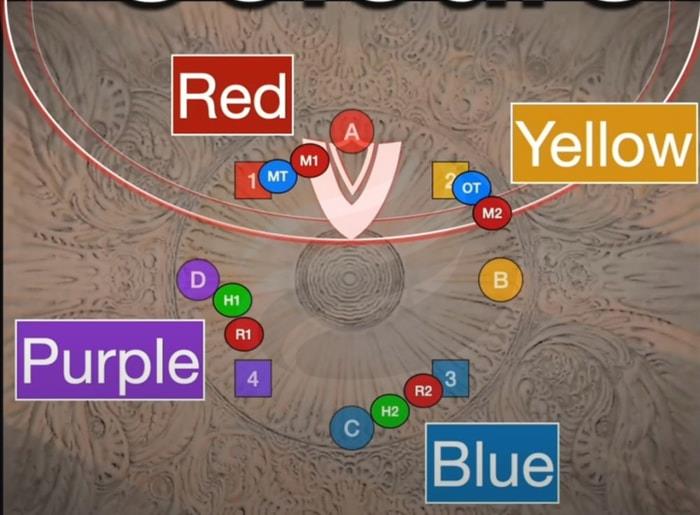
Color Quadrant Assignment: Each pair receives designated waymarks with corresponding colors that become crucial for later mechanics. These visual markers help players quickly identify their positions during high-stress sequences. Optimization: Assign colors based on role pairs for intuitive positioning during complex mechanics.
Phase 1 introduces Necron’s core mechanics that will evolve throughout the encounter. Mastering these patterns early establishes the foundation for handling more complex variations in later phases.
Blue Shockwave: Tank Buster Protocol
- Heavy tank buster targeting the primary enmity holder with extensive cleave radius.
- Main tank should immediately reposition to a corner location to prevent cleaving other party members.
- Two consecutive hits require either invulnerability abilities or substantial mitigation stacking. Expert Strategy: Coordinate with your co-tank to ensure proper cooldown rotation for subsequent busters.
Fear of Death: AoE Baiting Strategy
- Raid-wide AoE dealing moderate damage followed by eight purple puddle spawns.
- Each puddle generates hands that target the closest player with linear AoE attacks.
- Players must stand at the puddle closest to their designated spread position and bait line AoEs away from the group formation. Critical Error: Failing to bait properly can cause overlapping damage that overwhelms healers.
Cold Grip: Arena Navigation
Identify the safe zone at the arena’s center, then quickly evade toward the side opposite the glowing purple indicator. Timing Tip: Wait for the purple glow to fully manifest before moving to ensure proper timing.
Memento Mori: Light and Dark Division
- Necron illuminates with contrasting light and dark aspects.
- Dark Aspect: Accommodates exactly 2 players safely.
- Light Aspect: Provides space for up to 6 players.
- Standard raid strategy assigns tanks to the dark side while all other roles occupy the light side. Common Pitfall: DPS or healers accidentally entering dark side creates fatal overcrowding.
- Pre-position while avoiding hand mechanics.
- Dark side consistently spawns four hand sets → creating only one viable safe lane.
- Light side offers significantly more maneuverability space.
- Necron casts Smite of Gloom — substantial AoEs targeting all players. Pre-establish positions to prevent damage overlap.
- Tanks may experience brief downtime periods; utilize short cooldowns strategically to maintain damage output.
Soul Reaping: Safe Zone Logic System
Four potential safe zones exist: Outer edge, Inner circle, Sides Safe (categorized as “out” positioning), and Middle Safe (classified as “in” positioning). Always conceptualize in “Out” versus “In” terminology. Outer includes sides safe, while inner encompasses middle safe areas.
Soul Reaping Sequence Protocol
- Initial Cast: Identify the safe area (for instance, sides safe).
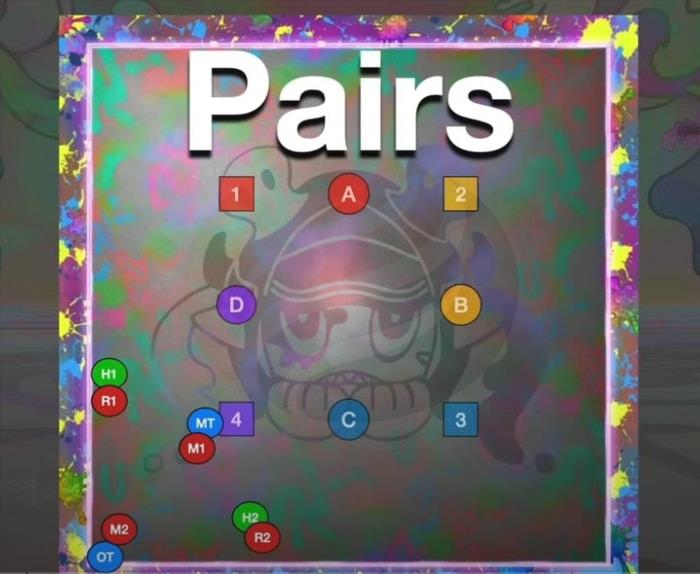
- If succeeded by Fourfold Blight → Coordinate with partner pairs.
- If followed by Twofold Blight → Form light party stacks.
- Subsequent Cast: Always presents the opposite pattern of the first (e.g., middle safe if sides safe was initial).
- Memorize this pattern for later application — communicate it clearly in party chat.
The End’s Embrace: Multi-mechanic Coordination
- Fear of Death → Spread to bait puddle placements.
- The End’s Embrace: Individual AoEs target each player → spawning additional hands.
- Place initial AoEs on the first hand set and bait appropriately.
- Telegraphed hand attacks — evade only after visual indicators appear.
- Blue Shockwave tank buster follows — tanks reposition to corners while others gather centrally.
Important Note: The stored Soul Reaping mechanic becomes active at this point.
Grand Cross: Complex Mechanic Layering
- Donut-shaped AoE → Stack centrally → Significant raid-wide damage.
- Arena contracts, rotating laser orbs materialize (identical to normal mode) accompanied by a 3-2-1 countdown timer.
Additional Mechanic Complexity
- Two puddles target random party members.
- Four towers spawn (either all cardinal or all intercardinal positions).
- Four spread AoEs target either support roles or damage dealers.
- Spinning laser mechanics occur simultaneously with these elements.
Execution Blueprint:
- Stack mid → Bait puddles → Transition to assigned color intercardinal.
- Initially disregard lasers — prioritize reaching designated positions first.
- Towers materialize + spread indicators appear:
- Spread-designated players: Position at color quadrant.
- Non-spread players: Occupy and soak towers.
- Monitor two laser sequences:
- Initial laser: Consistently strikes cardinal positions.
- Secondary laser: Consistently avoids intercardinal areas.
- Following the second laser:
- Tower-assigned players: Move into tower positions.
- Spread-designated players: Relocate to secondary clock positions.
- Reposition to a cardinal point and await three laser sequences (safe during 3rd–5th impacts).
- Roles exchange responsibilities for the subsequent set (spread ↔ tower assignment).
Phase Completion Protocol
- Return centrally for puddle evasion (two consecutive sets).
- Move to an intercardinal position for proximity-based AoE.
- Substantial mitigation and healing required for the subsequent Neutron Ring raid-wide attack.
Following the return to standard combat, the Adds Phase commences with escalating pressure mechanics that test your party’s damage output and individual competency.
- Rising Fear of Death: A progress bar gradually fills — your team must eliminate all additional enemies before it reaches maximum capacity.
- Small Hands: These spawn and target adjacent players with indicated line AoEs. While baiting is possible, rapid elimination typically proves more efficient.
- Large Additional Enemies: Two will materialize sequentially during this phase.
- Primary Tank: Provoke and position the initial large add facing away from the party.
- Secondary Tank: Assume control of the subsequent large add.
- These substantial adds cast linear AoE tank busters targeting the highest aggro — bait appropriately away from others.
Your party will encounter three total waves of minor additional enemies. Eliminate all additional enemies before the bar completes filling. At conclusion, a heavily damaging raid-wide occurs — apply significant mitigation. The boss becomes immune to targeting, and the platform vanishes, transporting each participant into an individual add encounter.
Solo Add Phase: Role-Specific Survival Tests
Each role confronts distinct challenges, operating under a 50-second Doom countdown. Destroy your designated add(s) before the timer elapses or face immediate death.
Tank Responsibilities
- Single add confrontation only.
- Interrupt Spreading Fear using Interject ability.
- Monitor for Choking Grasp (reduced-scale tank busters) — apply appropriate mitigation.
- Complete the encounter rapidly to minimize risk.
Damage Dealer Challenges
- Two adds requiring simultaneous management.
- Both will cast Choking Grasp (linear AoEs) — exit telegraph areas promptly.
- Maintain approximately equal add health pools — one add will randomly initiate Spreading Fear casting.
- Eliminate this specific add immediately before cast completion, then destroy the remaining one. Advanced Strategy: Pre-assign focus targets and communicate which add begins casting to ensure coordinated burst.
Healer Survival Trials
- Single add confrontation, but presenting the highest difficulty level.
- Early auto-attacks inflict severe bleeding — maintain constant self-healing.
- Chilling Fingers applies Movement Speed reduction — remove this debuff promptly.
- Choking Grasp deals considerable damage — sustain healing throughout.
- Bleeding effects may continue after add elimination, so persist with healing until secure.
Phase 2 escalates the encounter’s complexity by introducing enhanced versions of previous mechanics alongside entirely new challenges that demand perfect execution and coordination.
Specter of Death: Enhanced Hand Mechanics
- The boss conjures enormous hands — spread to secure lanes for Fear of Death execution.
- The End’s Embrace: Individual AoEs target each player → generating smaller hand AoEs. Avoid positioning these near the giant hand AoE areas. Contact with a giant hand returns you to the individual add phase — avoid completely.
- Hands telegraph AoE patterns — bait away from party formation.
- Boss casts Cold Grip → evade toward center, then toward the non-illuminated purple aspect.
Relentless Reaping: Sequential Pattern Recognition
- Four consecutive AoEs, consistently one of each classification, In (donut safe), Middle Safe (categorized as “in”), Out, and Sides Safe (classified as “out”).
- Document the sequence and record it in chat — the boss will randomly rotate them, but they activate in identical order.
- Final AoE in the sequence combines with either:
- Fourth Season → Coordinate with partner pairs.
- Second Season → Form light party groups.
Example Execution (Pairs Variation):
- Evade inward/middle.
- Outward → transition to sides.
- Remain outward/sides.
- Inward/middle in coordinated pairs.
Circle of Lives 1: Planetary Navigation
- Five blue celestial bodies materialize in fixed locations.
- They illuminate green preceding a donut AoE — advance toward the glowing planet.
- Pattern Recognition:
- Initial donut — move inward.
- Secondary donut — consistently positioned directly north or south of the first.
- Hands appear before the third donut — postpone movement if necessary to prevent intersection.
- Soul Reaping will follow, utilizing the previously stored mechanic combined with twofold/fourfold blight.
Mass Macabre – Tower Management System
- Melee combatants North, Ranged specialists South.
- Initial towers: 4-person capacity — occupy immediately, receiving a 4-second magic vulnerability debuff.
- Memento Mori casts — disregard light/dark division; separate Group 1 left, Group 2 right.
- When debuff expires → occupy 2-person towers:
- Tanks + melees forward positions.
- Healers + ranged rear positions.
- Blue Shockwave tank buster:
- Tanks exit towers and relocate to corners to manage the impact.
- All other players occupy 3-person towers.
- Exchange tower positions between groups; occupy again following debuff expiration. Prevent intersecting other groups with tank buster cleaves.
Repeated Mechanics: Pattern Reinforcement
Following Mass Macabre:
- Cold Grip evasion.
- Relentless Reaping repetition.
- Fear of Death spreading protocol.
- Circle of Lives 2 (four donuts + hand mechanics).
- Advance to the initial glowing circle.
- Evade hands + donuts in sequence.
Final Sequence: Encounter Conclusion
- Memento Mori 6:2 division with Smite of Gloom.
- Complete Grand Cross Phase repetition.
- Final Darkness of Eternity cast — eliminate the boss before completion.
Action Checklist
- Establish 4-4 party split with designated color quadrants
- Practice tank buster positioning and mitigation coordination
- Master Soul Reaping pattern recognition and storage
- Coordinate Grand Cross tower soaking and laser dodging
- Execute final phase mechanics with proper mitigation timing
No reproduction without permission:GameCDjnh » FFXIV Patch 7.3 – The Ageless Necropolis (Extreme) Trial Mechanics Guide Master Necron's mechanics with advanced strategies, common pitfalls, and optimization tips for The Ageless Necropolis (Extreme)