TL;DR
- Five proven rune farming locations remain viable after patch 1.03 with varying risk/reward profiles
- Mohgwyn Palace offers highest yields (3-4M/hour) but requires quest completion
- Lenne’s Rise provides 300-500K/hour with zero combat risk using death ball method
- Class selection significantly impacts farming efficiency – casters excel in early locations
- Advanced strategies combine rune multiplier items with optimized route execution
This comprehensive guide reveals five powerful rune farming locations that continue delivering exceptional results following Elden Ring’s 1.03 update. These carefully tested methods provide the currency foundation needed to overcome the Lands Between’s most challenging encounters.
Developed through extensive gameplay analysis, these strategies accelerate character progression whether you’re starting fresh or optimizing end-game builds. The methods range from zero-risk exploits to combat-intensive approaches, accommodating different playstyles and progression stages.
Each location offers distinct advantages: some require minimal gear investment while others demand specific weapons or abilities. Understanding each method’s requirements ensures you select the optimal approach for your current capabilities.
Your rune farming journey begins at the Third Church of Marika in Limgrave, where a hidden teleporter unlocks access to Greyoll’s Dragonbarrow – a mid-game region packed with farming potential.

Locate the concealed teleporter behind the church, submerged in water and obscured by foliage. This gateway transports you to Greyoll’s Dragonbarrow, where two distinct farming methods await exploitation.

Mount Torrent and journey southeast until reaching the initial Site of Grace positioned near a lengthy bridge patrolled by a dragon. Activate this grace point to establish your operational base.
Two primary approaches exist here: the beginner method targeting single enemies for ~2,000 runes per kill, or the advanced rotation eliminating multiple foes for approximately 20,000 runes per cycle.

Spellcasters significantly outperform melee builds in this location due to reduced engagement risk. Torrent utilization dramatically improves farming speed, enabling 126,000-150,000 runes hourly even during initial executions.
Critical execution tip: Always maintain distance from the bridge dragon while executing your farming rotation. Melee characters should prioritize hit-and-run tactics rather than sustained engagements.
Positioned remarkably close to your Dragonbarrow location, Lenne’s Rise presents a remarkably efficient farming opportunity with absolutely zero combat risk.
Navigate to this location by either braving the dragon-patrolled main bridge or opting for the poison trap route leading to a smaller, more accessible crossing.

Important navigation consideration: The smaller bridge hosts a field boss during nighttime hours, making daylight travel substantially safer for inexperienced players.
After activating the Site of Grace, mount Torrent and identify the trigger location beneath the bridge structure.
The core mechanic involves riding to a specific point that spawns a homing death sphere. Your objective is simply to evade this projectile and witness its cliffside demise.

Each successfully dodged sphere yields approximately 2,000 runes upon environmental destruction.
Optimization strategy: Master the timing between sphere spawn and your evasion maneuver. Consistent execution generates 300,000-500,000 runes hourly without any mortality risk, making this ideal for stress-free farming sessions.
Unlock Elden Ring’s most lucrative farming location by completing White Mask Varré’s questline, accessible shortly after beginning your journey.

This optional region becomes available through quest completion or later discovery of a teleporter in the Consecrated Snowfield.
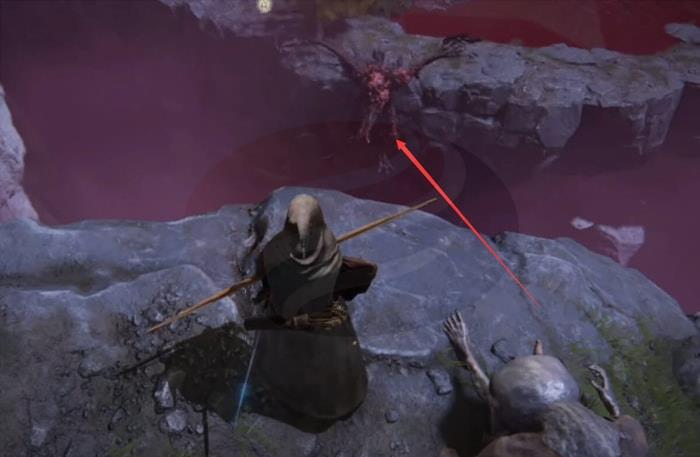
Execution methodology: Employ ranged attacks to aggro a specific bird creature across the chasm. The avian will pursue you aggressively, ultimately plummeting over the cliff edge.

Each successful bird elimination rewards approximately 11,000 runes without requiring specialized equipment or end-game area-of-effect capabilities.
Following each execution, briefly retreat to reset the area via the Site of Grace, then repeat the process.
Mohgwyn Palace represents the pinnacle of rune acquisition efficiency. Even without employing the Golden Scarab talisman or Pickled Fowl Foot consumable, properly executed rotations yield 3-4 million runes hourly – substantially outperforming other methods.
Advanced optimization: Combine this method with rune-enhancing items to amplify yields exponentially. The Golden Scarab increases rune acquisition by 20%, while Pickled Fowl Foot provides temporary 30% boosts when activated strategically.
Dominula Windmill Village, situated far north of your starting position, offers combat-intensive farming requiring specific progression milestones.

Access prerequisites: Acquire both halves of the Dectus Medallion to activate the Grand Lift, unlocking the Altus Plateau region.
This location demands either substantial area-of-effect capabilities or exceptionally powerful melee weaponry.
While technically accessible to beginners, Windmill Village’s farming efficiency significantly improves with advanced gear and character levels.
Early acquisition of specific weapons can provide necessary AoE potential, though post-nerf performance may not justify time investment compared to alternative methods.
War-Dead Catacombs presents an entirely different farming paradigm – passive rune accumulation through environmental manipulation.

Accessible after defeating Starscourge Radahn in Caelid, this method leverages the Mimic’s Veil item to create automated farming sessions.
Execution sequence: Enter the catacombs, proceed down the corridor, turn left, and descend the staircase partially to activate additional combatants.
Strategic positioning: Identify optimal hiding locations where enemy combatants will eliminate each other while you remain undetected.
The Mimic’s Veil, obtainable from Stormveil Castle’s dining hall, transforms this into a low-maintenance farming approach perfect for multitasking gamers.
Maximize your rune acquisition efficiency by understanding and implementing advanced optimization techniques across all farming locations.
Golden Scarab talisman acquisition: Located in Caelid’s Abandoned Cave, this item provides permanent 20% rune boost when equipped.
Strategic consumable usage: Time Pickled Fowl Foot activation to coincide with high-yield farming cycles for maximum benefit.
Execution rhythm mastery: The difference between average and exceptional farming yields often lies in perfecting reset timing and movement optimization.
Risk assessment protocol: Evaluate each location’s danger level against your current character capabilities and equipment.
Time investment analysis reveals Mohgwyn Palace delivers 10x greater efficiency than Third Church methods, though requiring substantial progression investment.
For comprehensive character development strategies, consult our Class Guide to optimize your build for specific farming approaches.
Character build synchronization: Certain farming methods align perfectly with specific character archetypes. Understanding these synergies dramatically improves farming efficiency.
Action Checklist
- Activate Third Church of Marika teleporter to access Dragonbarrow region
- Master Lenne’s Rise death ball method for risk-free 300K+ runes hourly
- Complete White Mask Varré questline to unlock Mohgwyn Palace access
- Acquire Golden Scarab talisman from Caelid’s Abandoned Cave
- Implement advanced optimizations with rune multiplier items
- Execute War-Dead Catacombs passive farming for multitasking sessions
No reproduction without permission:GameCDjnh » Elden Ring Runes Farming Guide Master Elden Ring's most efficient rune farming methods with detailed strategies and risk assessment
