TL;DR
- Use Rainbow Stones to test jump safety and prevent fatal falls
- Manage Fia’s health debuff by using Baldachin’s Blessing strategically
- Duplicate Remembrances at Walking Mausoleums to obtain both boss rewards
- Utilize Silver and Gold Pickled Fowl Feet for farming efficiency
- Explore extensively to avoid being under-leveled for main story bosses
Elden Ring presents numerous environmental hazards, with treacherous cliffs posing significant threats to unprepared adventurers. Rainbow Stones serve as essential navigation tools that provide crucial safety information before committing to dangerous jumps. These luminous markers offer more than decorative value, functioning as reliable indicators of survivable descent distances.
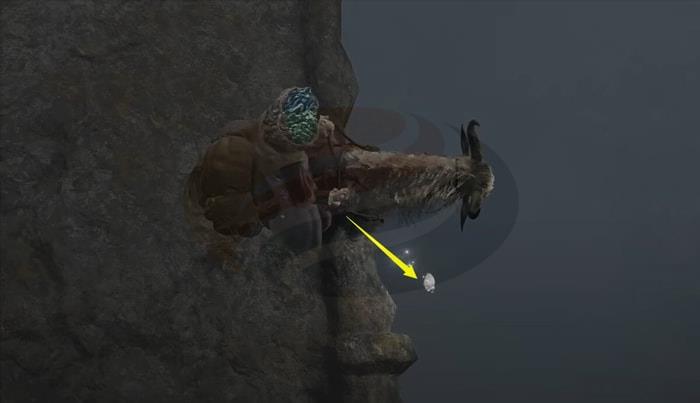


When thrown from an edge, Rainbow Stones exhibit clear physical behavior patterns: if the stone shatters upon impact, the fall proves fatal; if it remains intact, the descent proves survivable. This mechanic becomes particularly valuable when navigating areas like the Siofra River or Mountaintops of the Giants where verticality presents constant navigation challenges.
A particularly insidious mechanical interaction involves Fia, the Deathbed Companion, whose affectionate embraces impose a hidden health reduction penalty. Many players complete substantial portions of their journey unaware they’re operating with diminished maximum HP.
The debuff manifests as a small icon near your health bar, indicating a 5% reduction in total health points. This seemingly minor penalty frequently determines survival outcomes in challenging combat encounters where narrow margins separate victory from defeat.

Resolution requires consuming Baldachin’s Blessing, the item Fia provides after each embrace. This consumption not only removes the health penalty but grants temporary poise enhancement, transforming the detrimental effect into a beneficial combat advantage.

Eliminating non-player characters carries severe consequences, including permanent questline termination, lost dialogue opportunities, and missed item acquisitions. Once slain, NPCs cannot be revived through conventional means, creating irreversible narrative and gameplay consequences.
However, accidental aggression toward NPCs can be remedied through the Church of Vows atonement system. This requires obtaining Celestial Dew, either through open-world discovery or merchant purchase from vendors like Pidia.

The restoration process involves interacting with the church statue while possessing Celestial Dew, which de-aggros targeted NPCs and restores normal interaction parameters as though hostilities never occurred.
Defeating major storyline bosses rewards players with Remembrances, powerful items exchangeable for unique weapons, spells, or other significant upgrades at the Roundtable Hold.

While initial exchanges require choosing between two available rewards, strategic planning enables acquiring both options through Remembrance duplication.
Walking Mausoleums scattered throughout the Lands Between provide limited duplication opportunities. Clearing the crystalline growth from these mobile structures causes them to collapse, granting access to interior duplication altars.
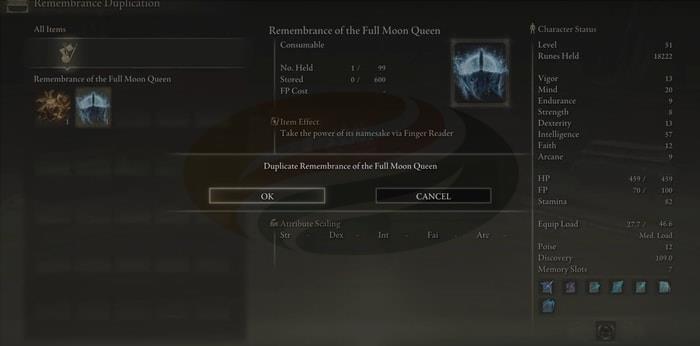
Each mausoleum can duplicate one Remembrance, requiring careful consideration regarding which boss rewards to duplicate given the finite availability of these structures.
When targeting specific enemy drops with low acquisition rates, Silver-Pickled Fowl Feet dramatically improve farming efficiency. These consumables boost item discovery statistics, significantly increasing drop frequency for rare equipment, armor sets, and materials.
Crafting requires three Rowa Fruit, one Four-Toed Fowl Foot, and one Silver Firefly, with additional specimens discoverable throughout the game world.

Silver-Pickled Fowl Feet provide a substantial 50-point discovery bonus, while Gold-Pickled Fowl Feet offer 30% increased rune acquisition from defeated enemies.
Gold variants utilize nearly identical recipes, substituting Golden Fireflies for silver specimens. Alternatively, players can purchase them from Patches after completing his questline or discover them during exploration.
Strategic timing proves crucial since effects persist for only three minutes. Coordinate usage during encounters with high-rune-yield enemies or when farming rare item drops to maximize efficiency gains.
Early gameplay stages feature limited Smithing Stone availability, creating resource allocation dilemmas. However, progression through the game dramatically increases availability, eventually enabling unlimited purchases from specific merchants.
Both standard Smithing Stones and Somber Smithing Stones follow this progression pattern, transitioning from scarce resources to readily available commodities.
Hording upgrade materials for hypothetical superior equipment represents inefficient resource management. Immediate utilization on currently equipped weapons provides tangible combat advantages that facilitate smoother progression through challenging content.
Upgraded equipment enhances damage output and scaling effectiveness, directly contributing to gameplay advancement. Delayed usage results in inventory stagnation where materials lose relative value as players access more abundant sources.
Excessive concern regarding stat allocation represents unnecessary anxiety, given the game’s built-in character respecification system. Following Rennala’s defeat at the Raya Lucaria Academy, players gain access to complete attribute reassignment capabilities.
While focusing on statistics that enhance your chosen class and build remains important, the flexibility to completely redesign your character’s statistical foundation becomes available relatively early in the narrative progression.

This eliminates the necessity of creating entirely new characters to experiment with different playstyles. Transitioning from melee-focused builds to magical archetypes or hybrid configurations becomes achievable without restarting your entire journey.
Initial class selection does create minor statistical variations, with suboptimal choices resulting in approximately 5-8 level points difference compared to ideal starting classes for specific build types.
A commonly overlooked resource involves the scattered glowing skulls encountered throughout the Lands Between. These subtle environmental objects provide immediate rune rewards when destroyed.
Mounted players can efficiently collect these resources by sprinting over them, while foot travelers can utilize rolling maneuvers to crush them rapidly without weapon engagement.

Particularly during initial gameplay phases, the supplementary runes from these skulls provide valuable leveling resources that accumulate significantly over time.
Major boss encounters reward players with Great Runes, powerful artifacts that require specific activation procedures. Many adventurers mistakenly believe equipping these items automatically confers their benefits.
Activation requires visiting designated divine towers corresponding to each acquired Great Rune. Following activation and equipment assignment, visual indicators appear suggesting active status.

However, actual benefit activation necessitates consuming Rune Arcs, single-use items that temporarily activate equipped Great Rune effects until death occurs.
Comprehensive exploration represents a fundamental aspect of character development in Elden Ring. Venturing beyond primary narrative pathways yields substantial benefits across multiple progression dimensions.
Thorough investigation of the Lands Between provides enhanced rune acquisition for level advancement, superior equipment discoveries, and expanded tactical options.
Extended struggles against storyline bosses frequently indicate insufficient exploration rather than skill deficiencies. Character under-leveling and equipment inadequacy commonly underlie progression obstacles that comprehensive exploration effectively resolves.
Strategic balance between narrative advancement and world discovery ensures smoother progression through increasingly challenging content while minimizing frustrating repetition.
Players preferring weapon skill utilization over parrying mechanics can acquire the No Skill Ash of War from the Warmaster’s Shack merchant.
This specialized ash enables main hand weapon skill activation while maintaining shield functionality. The solution preserves defensive capabilities while enabling offensive special move execution.
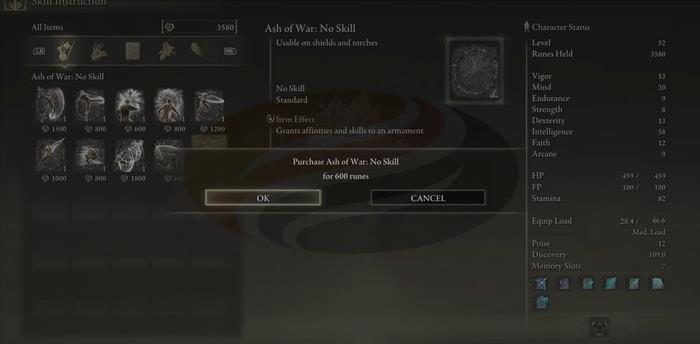
For situational parrying requirements, maintaining a secondary shield equipped with parry capability provides flexible response options without compromising primary combat preferences.
Spirit summons provide invaluable combat assistance throughout your journey. Following initial interaction with Melina, returning to the Church of Elleh during nighttime hours triggers an encounter with Renna.

This spectral entity provides the Spirit Calling Bell essential for summoning assistance, along with the Lone Wolf Ashes summoning item.
Early summon diversification includes obtaining the Jellyfish spirit through triple dialogue interactions with Roderika at Stormhill Shack.
The skeletal Militiaman summon acquired after defeating the Tibia Mariner boss offers exceptional tactical advantages.
Their distinctive resurrection capability enables persistent battlefield presence provided enemies don’t attack during the revival animation sequence.
Action Checklist
- Use Rainbow Stones to test jump safety before committing to dangerous descents
- Consume Baldachin’s Blessing after hugging Fia to remove health debuff
- Duplicate key Remembrances at Walking Mausoleums
- Utilize Silver-Pickled Fowl Feet when farming rare enemy drops
- Activate Great Runes with Rune Arcs before challenging encounters
No reproduction without permission:GameCDjnh » 12 Mistakes and Tips in Elden Ring Essential Elden Ring mistakes to avoid and expert strategies for optimal gameplay progression