TL;DR
- Normal Group Dungeons offer the fastest farming with instanced bosses and no competition
- World Boss routes in base game zones provide excellent solo-friendly options
- Quickened trait is universally valuable for all companion builds and roles
- Always keep your companion summoned and active to enable gear drops
- Combine farming methods to maximize efficiency and avoid burnout
Acquiring optimal Companion gear in The Elder Scrolls Online presents a significant challenge due to notoriously low drop rates and random trait distribution. However, strategic farming approaches can dramatically improve your success rate. This comprehensive guide from Hack The Minotaur reveals the most effective farming locations and essential trait selection strategies to maximize your companion’s combat effectiveness.
While Companion gear can technically drop from any enemy throughout Tamriel, boss-level enemies provide substantially improved drop chances. The critical mechanic to understand is that No Companion Equals No Drops – your ally must be actively summoned and accompanying you during combat to enable gear acquisition. This requirement makes efficient farming fundamentally different from standard equipment collection.
1. Normal Group Dungeons (Most Efficient)
Normal Group Dungeons represent the pinnacle of farming efficiency for several compelling reasons. The instanced nature ensures no competition from other players, allowing you to methodically clear content at your preferred pace. Boss encounters in these dungeons typically feature significantly reduced health pools compared to World Bosses, making them ideal for rapid farming cycles.
Recommended dungeons include Wayrest Sewers 1 (Normal), Fungal Grotto 1, and Crypt Of Hearts. Pro tip: In Wayrest Sewers, focus on the initial 5-6 rooms containing individual bosses rather than completing the entire dungeon. This approach typically yields 5+ boss kills in under 10 minutes for adequately leveled characters.
2. World Bosses (Solo-Friendly Route)
Base game zone World Bosses offer excellent farming opportunities with manageable difficulty. The Deshaan circuit provides an optimal route:
• Start at Short-Tusk’s Hillock in northern Deshaan
• Proceed south to Grove of the Abomination
• Travel to Ghost Snake Vale Wayshrine for Dire Bramble Patch
• Complete at Druitularg’s Ritual Altar northeast of previous location
Companion tanks or healers significantly enhance solo viability, while duo teams with two companions can clear this route exceptionally quickly.
3. Dolmens (Experience & Gear Combo)
Dolmen final bosses provide dual benefits: potential companion gear drops alongside valuable jewelry for deconstruction or guild trader sales. Optimal farming zones include Alik’r Desert, Bangkorai, Malabal Tor, and Auridon, where organized groups frequently operate. Higher-level characters can efficiently solo these events while simultaneously gaining substantial experience for character progression and companion leveling.
4. Public Dungeons (Crowd-Dependent)
Public Dungeons remain popular despite variable conditions, typically featuring 5-6 bosses per instance. Prime locations include:
Forgotten Crypts in Deshaan – drops companion gear alongside powerful sets like Mother’s Sorrow and Plague Doctor
This location provides excellent gear diversity but suffers from peak-time crowding.
Crimson Cove in Malabal Tor – yields companion equipment, substantial ESO gold, experience points, and the coveted Spinner’s Garments set.
Labyrinthian in Western Skyrim – serves as an excellent alternative when other public dungeons experience heavy traffic
Be aware that consecutive boss kills may trigger loot cooldowns, making timing and route planning essential.
5. Delves (Beginner-Friendly Option)
While Delve farming represents the slowest method due to single-boss instances and 5-10 minute respawn timers, it provides exceptional accessibility for lower-level characters. Additional benefits include skill books, Skyshards, and zone-specific gear sets, making it ideal for multi-objective farming sessions.
Best Traits for Your Companion Gear
As you accumulate companion equipment, understanding trait prioritization becomes crucial for optimizing performance. While leveling companions, traits provide minimal impact, but end-game content demands careful trait selection for maximum effectiveness.
Quickened: the premier universal trait reducing ability cooldowns across all roles
Vigorous: significantly boosts companion health pool, essential for tank builds
Bolstered: provides damage reduction for enhanced survivability
Soothing: amplifies healing output for dedicated healer companions
Aggressive: increases damage dealt, ideal for DPS-focused builds
Quickened
The Quickened trait stands as the most versatile option, reducing lengthy ability cooldowns that often handicap companion effectiveness. This trait benefits tank, DPS, and healer builds equally by ensuring critical abilities remain available more frequently.
Vigorous
Tank-oriented companions benefit tremendously from Vigorous trait stacking, potentially exceeding 40,000 maximum health to withstand punishing boss attacks.
When building companion tanks, prioritize Vigorous and Bolstered traits in combination for optimal damage mitigation and survivability.
Bolstered
The Bolstered trait complements health stacking by directly reducing incoming damage. This synergistic combination creates exceptionally durable tank companions capable of handling demanding content.
Soothing
Healer companions achieve maximum efficiency with Soothing trait focus, enhancing their healing output for both player and self-preservation.
Aggressive
Damage-focused builds prioritize the Aggressive trait to maximize companion damage contribution, though this specialization comes at the cost of versatility.
Successful companion gear acquisition requires more than just location knowledge – it demands strategic execution. One common mistake involves underestimating the importance of companion activation; remember that passive companions cannot receive gear drops regardless of farming efficiency.
Optimize your farming sessions by combining methods – start with Normal Group Dungeons during peak hours when Public Dungeons experience crowding, then transition to World Boss routes during off-peak times.
For maximum time efficiency, consider these advanced strategies:
• Implement the 30-minute rule: If no companion gear drops within 30 minutes, switch locations to reset your RNG momentum.
• Utilize companion synergy: Tank companions enable safer solo farming, while healer companions extend farming session duration.
• Multi-objective farming: Always combine companion gear acquisition with other objectives like Skyshard collection, experience farming, or set item acquisition.
Avoid the frustration of extended farming sessions by setting realistic goals – aim for 2-3 gear pieces per session rather than specific traits, then use our Class Guide principles to optimize your companion’s role effectiveness regardless of gear quality.
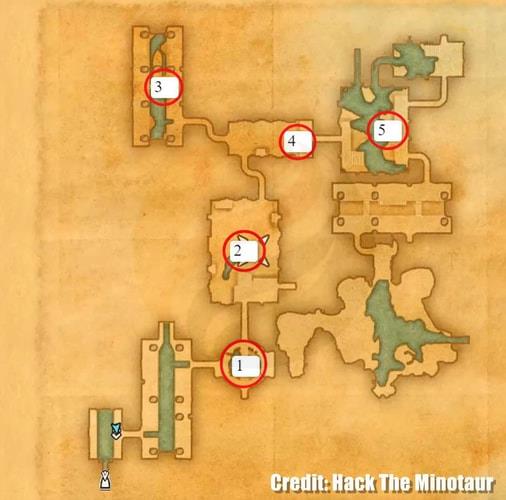
Wayrest Sewers 1 (Normal)
Remember that companion gear represents just one aspect of character optimization. For comprehensive gameplay enhancement, explore our Complete Guide to ESO systems and mechanics for a holistic approach to game mastery.
Action Checklist
- Summon and activate your companion before beginning any farming session
- Start with Normal Group Dungeons (Wayrest Sewers 1 recommended)
- If crowded, switch to World Boss route in Deshaan
- Farm Dolmens during peak hours for experience and gear combination
- Prioritize Quickened traits for universal effectiveness
- Check our Weapons Unlock guide for additional optimization
No reproduction without permission:GameCDjnh » How to Get Companion Gear Fast in ESO Master efficient Companion gear farming with strategic location selection and trait optimization in ESO