TL;DR
- Complete Endwalker MSQ and all Hildibrand quests from ARR to unlock trial
- Master Asura’s sword patterns and clone mechanics for consistent clears
- Position strategically during Iconography phases to minimize movement
- Coordinate Limit Break usage during Ordered Chaos for maximum efficiency
- Prepare with item level 625+ and study phase transitions for success
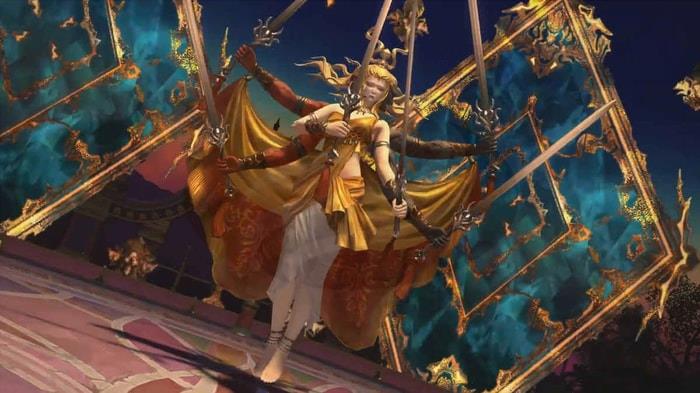
The Gilded Araya represents one of Final Fantasy XIV’s most demanding trial encounters, introduced in patch 6.55 as the climax to the beloved Hildibrand adventure series. This eight-player confrontation challenges teams against Asura, a formidable entity commanding multiple blades and devastating magical assaults. Entry demands meeting specific prerequisites including an item level minimum of 625 and any level 90 combat job. For players seeking to expedite their progression, FF14 character boost services provide immediate access to level 90 capabilities. This comprehensive guide delivers proven strategies for both accessing and conquering this memorable trial experience.
Gaining access to The Gilded Araya trial requires completing two significant content tracks: the main Endwalker narrative arc and every Hildibrand quest from A Realm Reborn through Endwalker expansions. The Hildibrand adventures form an extensive collection of comedic side stories chronicling the exploits of the eccentric self-styled gentleman detective Hildibrand Manderville and his unconventional companions. Initiate this journey by accepting the inaugural quest “The Rise and Fall of Gentlemen” from Wymond located in Ul’dah – Steps of Nald at coordinates X:9.8, Y:8.7, accessible with any level 50 or higher combat role.
The trial itself integrates into the concluding Hildibrand narrative “Gentlemen at Heart,” available from Delion in Radz-at-Han at X:11.4, Y:11.5 after finishing the preceding mission “Of Duplicity and Duplication.” Progress through the quest chain, experiencing the characteristic humorous cutscenes until reaching the pivotal moment where trial access unlocks via the Duty Finder interface.
Asura presents a multifaceted combat challenge with diverse attack patterns and mechanics capable of rapidly decimating unprepared parties. Victory hinges on meticulous observation of her blade animations, precise evasion of area-of-effect attacks, and seamless coordination among all team members. Below you’ll find detailed breakdowns of primary mechanics alongside professional execution strategies.
Lower Realm – Universal raid-wide damage dealing moderate impact; maintain awareness of arena boundaries as touching edges proves instantly fatal.
Asuri Chakra – Concentric circular area attacks; position yourself between the expanding rings to avoid incoming damage.
Cutting Jewel – Targeted tank-buster area assault; employ defensive cooldowns strategically to reduce damage intake.
Ephemerality – Generates multiple spectral duplicates in the air that detonate into expanding circular zones. Optimal positioning involves standing at maximum melee distance aligned with the central point between two primary images.
Iconography – Summons an enormous duplicate of herself, executing a sequence of iconic abilities before the clone replicates identical movements.
Pedestal Purge – Centered area blast originating from the boss; the duplicate performs the same attack combined with Iconic Execution. Create distance to evade.
Wheel of Deincarnation – Annular area effect with safe zone near the center; position yourself adjacent to the clone for safety.
Bladewise – Linear area attack targeting random players; Iconic Execution discharges a substantial line assault through the arena’s midline. Relocate to either flank of the duplicate to avoid.
Six-bladed Khadga – Six sequential semicircular area assaults. The pattern typically follows forward, left, right sequences repeated or forward, right, left variations. Maintain position behind Asura throughout this sequence while remaining vigilant for lateral attacks.
The Face of Wrath – Partitions the entire battlefield into blue and red segments. Evade the facial hue displayed on-screen; impact results in incapacitating stun.
Myriad Aspects – Two consecutive cone-shaped area assaults. Establish position in the secure zone of the initial cone volley, then maneuver into the expired areas as they detonate to avoid subsequent waves.
Bladescatter – Linear area attacks firing randomly followed by circular patterns rotating around the arena. Simply advance into the initial safe area from the protected side.
Iconic Execution 2 – Iconic Execution initially teleports the duplicate to a random arena edge. The secondary Iconic Execution triggers the actual area effect as the clone erupts with energy. Begin near the arena center to facilitate rapid repositioning after teleportation completes.
Ordered Chaos – Half the party receives ordered chaos area markers requiring dispersion during casting. Subsequently, the party gains Level 3 Limit Break capacity to conclude the encounter.
Mastering The Gilded Araya extends beyond mechanical knowledge to strategic execution and error prevention. Common failure points include misjudging Ephemerality safe zones, improper Iconography positioning, and failed Ordered Chaos coordination. For optimal performance, assign specific positions during clone phases and establish clear communication protocols for mechanic calls. Advanced players can shave significant time by optimizing damage during phase transitions and pre-positioning for upcoming mechanics.
These comprehensive strategies will significantly enhance your success rate against this formidable adversary. The mechanical insights derive from WeskAlber’s detailed YouTube analysis. For visual reference, consult the embedded video demonstration. Consider subscribing to his channel if you find the content valuable. Best wishes for your triumphant victory, and enjoy this exceptional trial experience!
Action Checklist
- Complete Endwalker MSQ and all Hildibrand quests through patch 6.55
- Verify item level 625+ requirement and level 90 job
- Study Asura’s attack patterns and phase transitions
- Practice positioning for Ephemerality and Iconography mechanics
- Coordinate with party members for Ordered Chaos and Limit Break execution
No reproduction without permission:GameCDjnh » FFXIV Patch 6.55 The Gilded Araya Trial Guide – How to Unlock It and Defeat Asura Master FFXIV's Gilded Araya trial with expert strategies for unlocking and defeating Asura efficiently