TL;DR
- Heatshiver and Yoke of Suffering are mandatory uniques providing over 100% damage boost
- Budget ranges from 80 Chaos for White Maps to 600 Chaos for Complete Atlas completion
- Frost Blades main link combines Trinity support with Nightblade for massive damage scaling
- Leveling progression requires careful gem swaps at specific levels for optimal performance
- Trickster ascendancy provides perfect synergy with evasion, energy shield, and frenzy charges
Greetings, exiles! Today we’re diving deep into the Frost Blades Trickster Build, a lightning-fast melee build that excels at clearing entire screens while maintaining solid single-target damage. This guide will transform you from a beginner to an endgame powerhouse through strategic gear selection and skill optimization.
Budget Tiers Explained
White Maps Investment: Approximately 80 Chaos Orbs will get you comfortably through early endgame content with proper gear selection.
Yellow Maps Progression: Budget increases to around 150 Chaos Orbs for smoother map clearing and boss encounters.
Complete Atlas Completion: For full endgame viability, plan to invest about 600 Chaos Orbs in optimized equipment.
Core Build Mechanics
The Frost Blades Trickster operates on elemental conversion principles, transforming physical damage into cold damage while leveraging the Trinity support gem for additional elemental penetration. The build’s strength comes from stacking multiple damage multipliers through unique interactions between Heatshiver, Yoke of Suffering, and the Trickster’s innate synergies with attack speed and critical strikes.
Mandatory Unique Items
Heatshiver
Heatshiver stands as the cornerstone of this build, delivering an incredible damage multiplier exceeding 100% through its unique cold-to-fire conversion mechanic. This helmet not only amplifies your damage significantly but also activates Trinity support by ensuring you deal two elemental damage types simultaneously. While essential for maximum performance, you can progress adequately without it initially.
Yoke of Suffering
Yoke of Suffering becomes mandatory due to its ability to apply shock with all damage types, enabling consistent 30% increased damage taken on bosses. Additionally, this amulet provides 5% more damage per ailment inflicted, creating substantial damage scaling against tough enemies.
Recommended Unique Alternatives
The Taming offers excellent elemental damage bonuses and resistance compensation.
Cherrubim’s Maleficence provides substantial life recovery and chaos damage enhancements.
Rare Body Armour Selection
Golem Wrap Triumphant Lamellar: Target minimum 100 life, combined 1000 armour and evasion rating, adequate resistances, and bonus physical damage reduction modifiers.
Weapon Requirements
Vengeance Bite: Seek at least 400 combined DPS across physical, cold, and fire damage with 7.5% base critical strike chance.
Tempest Bite: Upgrade to minimum 600 combined DPS with maintained 7.5% critical chance.
Glove Options
Wrath Fingers Slink Gloves: Prioritize life and elemental resistance rolls.
Agony Claw Whrmscale Gauntlets: Look for life, resistances, and the valuable “increased damage with hits against chilled enemies” modifier.
Shield Specifications
Bramble Sanctuary: Aim for minimum 80 life, evasion rating, resistances, accuracy rating, and 15% chance to suppress spell damage.
Flasks and Utility
Divine Life Flask for emergency recovery
Quicksilver Flask for mobility and map clearing speed
Diamond Flask ensuring critical strike consistency
Jade Flask boosting evasion for survivability
Rumi’s Concoction providing substantial block chance and armor
Common Equipment Mistakes
Avoid overinvesting in physical damage modifiers since most of your damage converts to elemental. Don’t neglect spell suppression cap – aim for 100% through gear and passive tree combinations.
Main Skill Links
Frost Blades – Elemental Damage with Attacks – Nightblade – Multistrike – Trinity – Ice Bite
Aura Configuration
Hatred – Determination – Precision (Level 1) – Herald Of Ice
Totem Setup
Vaal Ancestral Warchief – Ancestral Protector – Multiple Totems – Culling Strike
Defensive and Mobility Skills
Vaal Molten Shell – Increased Duration – Vaal Grace – Blood Rage
Curse Application
Frost Bomb – Assassin’s Mark – Mark on Hit
Movement Skill
Whirling Blades – Lifetap – Faster Attacks
Gem Leveling Strategy
Keep your main Frost Blades gem in your weapon for automatic experience gain during mapping. Level alternate gems in off-slots for vendor recipes or future builds.
Jewel Mod Priorities
Attack Speed: Crucial for smooth gameplay and damage output
Critical Multiplier: Essential for scaling single-target damage against bosses
Maximum Life: Never sacrifice survivability for minor damage gains
Unique Jewel Options
Inspired Learning: While not mandatory, this jewel provides Headhunter-like effects by granting one mod from each rare enemy eliminated.
Watcher’s Eye Optimization
Watcher’s Eye Prismatic Jewel: Prioritize the “increased cold damage while affected by Hatred” modifier for maximum damage amplification.
Early Game Foundation
You can begin utilizing Frost Blades immediately from character creation, with virtually unlimited scaling potential. (Expert advice: Purchase Sapphire Rings from Nessa during Act 1. The concluding boss of Act 1 deals substantial cold damage, and these rings provide crucial cold resistance.)
Skill Progression Timeline
The initial skill acquired is Viper Strike. Utilize this skill until reaching the first settlement.
There, communicate with Nessa and purchase Frost Blades.
Upon completing the Mercy Mission quest, select Momentum as your reward and support your Frost Blades with this gem.
At level 8, enhance Frost Blades with Added Cold Damage support.
Additionally, at level 8, establish an Ancestral Protector configuration. This totem provides substantial assistance during challenging boss encounters.
Another valuable secondary skill to incorporate is Frost Bomb. Employ this against bosses to make them vulnerable to additional cold damage.
Reaching level 10 enables Clarity for enhanced mana regeneration.
At level 16, introduce Precision and Herald of Ice for improved accuracy and area damage.
Upon attaining level 18, include Elemental Damage with Attacks in your configuration.
Also, at level 18, substitute Added Cold Damage with Melee Physical Damage and incorporate Faster Attacks into your totem setup.
Reaching level 38, replace Momentum with Multistrike for superior attack sequencing.
At level 38, it’s also an optimal moment to convert your totem configuration into a dual totem arrangement.
Always remember to deploy both totems during significant boss encounters.
Additionally, at level 38, establish a configuration featuring Poacher’s Mark and Mark on Hit.
Ensure you exchange this for Assassin’s Mark when eliminating the Precise Technique node approximately at level 68.
If you acquire 5-link or 6-link equipment, you can finalize your Frost Blades configuration.
If you already possess your Heatshiver, utilize this alternative configuration.
Reaching level 69, substitute Clarity with Determination for enhanced survivability.
Upon attaining level 69, you’ll commence utilizing claws, marking the appropriate time for Nightblade support.
Reaching level 70, exchange your Precision for a level 1 Precision. Also, activate Hatred for additional damage amplification.
Leveling Equipment Recommendations
Tabula Rasa for early six-link capabilities
Goldrim providing substantial elemental resistance during campaign progression
Lochtonial Caress offering attack speed and power charge generation
Wanderlust ensuring reliable freeze immunity
The Princess delivering early elemental damage bonuses
Lycosidae guaranteeing hit consistency against evasive enemies
Praxis solving early mana sustainability issues
Lakishu’s Blade serving as a reliable weapon upgrade
Innsbury Edge providing chaos damage conversion
Fate of the Vaal for critical strike enhancement
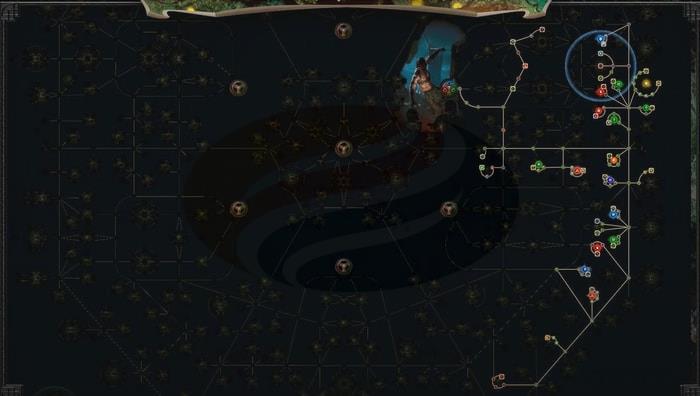
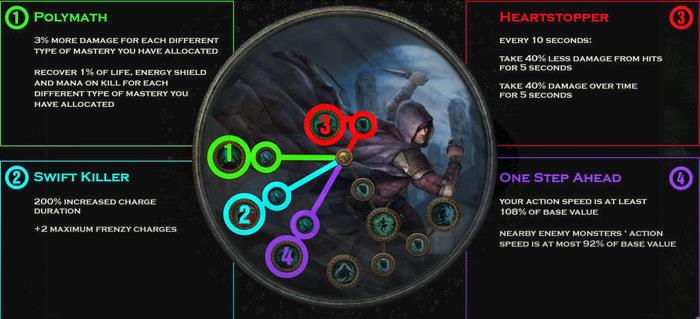
Ascendancy
Pantheon
Major God: Brine King – Provides freeze immunity and stun recovery
Minor God: Tukohama – Grants substantial physical damage reduction while stationary
Final Thoughts
This concludes our comprehensive Frost Blades Trickster Build guide. Remember that successful build execution requires understanding the synergy between your gear choices, skill gems, and passive tree allocation. For those seeking to accelerate their progression, consider exploring our Weapons Unlock guide for additional weapon optimization strategies.
Advanced players should focus on capping spell suppression, maximizing critical strike chance, and optimizing flask uptime for peak performance in endgame content.
Action Checklist
- Acquire mandatory Heatshiver helmet and Yoke of Suffering amulet
- Set up core gem links following the recommended skill combinations
- Progress through campaign using leveling gear and skill transition points
- Transition to endgame setup at level 68-70 with optimized rare gear
- Fine-tune skill tree and ascendancy choices for your playstyle
- Optimize jewel sockets with attack speed, critical multiplier, and life modifiers
- Practice boss mechanics and flask management for endgame content
No reproduction without permission:GameCDjnh » PoE Builds 3.22: Frost Blades Trickster Build Master the Frost Blades Trickster with comprehensive gear, skill, and leveling strategies for Path of Exile