TL;DR
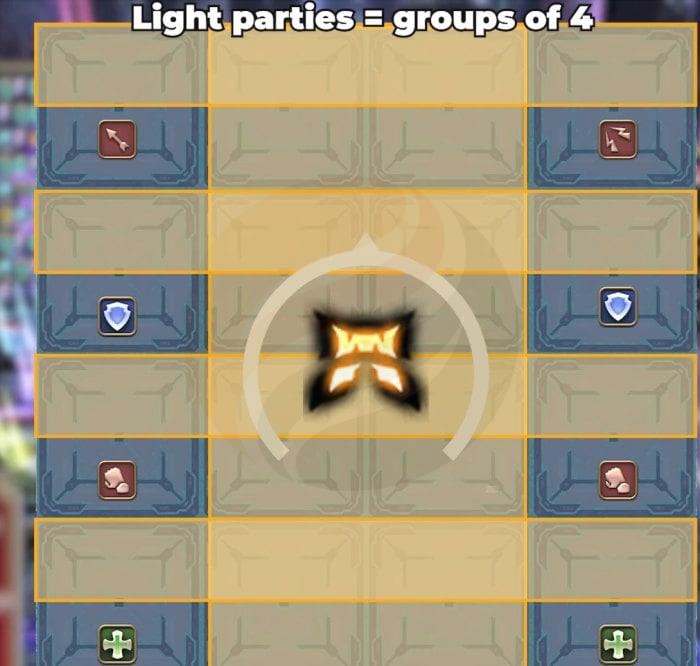
- Master light party positioning for Witch Hunt mechanics with tank/healer and melee/ranged pairs
- Coordinate debuff resolutions using smiley face safe spots and grid-based explosion patterns
- Execute precise tower mechanics and debuff cleansing during Ion Cluster sequences
- Utilize tank LB3 for Cross Tail Switch and manage Mustard Bomb transfers
- Memorize safe sword patterns for Raining Swords and coordinate final enrage mitigation
Prepare to tackle one of Final Fantasy XIV’s most demanding raid encounters with this comprehensive strategy guide. Drawing from expert analysis by content creator Rinon, we’ll break down the intricate mechanics of the AAC Light-Heavyweight M4 Savage battle. This walkthrough provides actionable tactics to transform this challenging fight into a decisive victory for your static group.
Wicked Thunder initiates combat with Wrath of Zeus, requiring immediate raid-wide healing. As the opening sequence concludes, she relocates northward and channels Bewitching Flight, summoning multiple artillery cubes along the arena’s eastern flank. Simultaneously, she activates her wing laser charging sequence, mirroring the standard difficulty version. Both the wing-mounted lasers and newly spawned cubes will shortly discharge linear area-of-effect attacks spanning the battlefield. Identify and occupy secure positions between these overlapping danger zones.
Following their initial discharge, the wing lasers imprint four violet energy trails across the floor surface. These markings will subsequently illuminate and detonate sequentially, demanding precise positional awareness. The detonations occur in alternating patterns—either the interior pair or exterior pair activates first. Position yourself either centrally or along the perimeter based on the activation sequence. Concurrently, Wicked Thunder begins casting Electrifying Witch Hunt, generating additional artillery batteries on the western arena perimeter. You must simultaneously evade the initial floor line explosions while navigating the newly spawned cube attacks. Organize your raid into two vertical formations with ranged combatants and healers occupying northern and southern positions, while melee specialists and tanks maintain proximity to the boss.
A Witch Hunt cast follows this sequence, synchronized with the two remaining floor lines beginning their glow sequence prior to detonation. As this casting initiates, the boss displays one of two distinct markers, designating either the four most distant players or the four closest combatants for targeting. Should your default formation positions not satisfy the targeting prerequisites, execute rapid position exchanges with adjacent team members to correct assignments.
Widening & Narrowing Witch Hunt
The subsequent assault manifests as either Widening Witch Hunt or Narrowing Witch Hunt. The boss alternates between point-blank circular areas and donut-shaped avoidance zones across four consecutive attacks. With Widening Witch Hunt, the sequence commences with a circular area-of-effect, whereas Narrowing Witch Hunt begins with the donut pattern. The boss additionally displays proximity indicators—either close or far designations—four times throughout the casting duration, following an alternating sequence. Thus, if close markers appear initially, the pattern progresses close-far-close-far. These markers indicate that the two nearest or most distant players will summon spectral duplicates simultaneously with the donut or circle area resolutions.
Your objective involves executing the in-out-in-out or out-in-out-in area avoidance maneuvers while positioning players to intercept the close-far-close-far clone leaps in pairs, with each combatant handling one interception.
An effective resolution strategy positions melee combatants and tanks along cardinal directions, while healers and ranged specialists occupy intercardinal positions. Support roles initiate the baiting sequence, with tanks consistently taking the first close interception and healers assuming the initial far interception. Damage dealers then handle the third and fourth interceptions—ranged specialists taking the second far bait and melee specialists handling the second close bait. For instance, with close-far-close-far sequencing: tank, healer, melee, ranged. For far-close-far-close patterns: healer, tank, ranged, melee.
Electrope Edge
Following successful Witch Hunt resolution, another Wrath of Zeus raid-wide assault precedes Electrope Edge activation. Electrope Edge generates four electromagnetic mines positioned in each arena corner. Subsequently, she discharges energy beams across intercardinal axes targeting the mines. Primary imperative: avoid beam contact. Secondary: monitor mine interactions closely. Should any electromagnetic mine receive impact from two Witchgleam beams simultaneously, it will shortly detonate, transforming that quadrant into lethal territory.
Wicked Thunder then channels Sidewise Spark. This hemispherical telegraph covers one of the two secure quadrants. Players must then observe Wicked Thunder’s animation cues. The animation displays either four substantial orbs or eight miniature orbs. Eight small orbs mandate dispersed positioning within that quadrant, while four large orbs require paired stacking within the designated area.
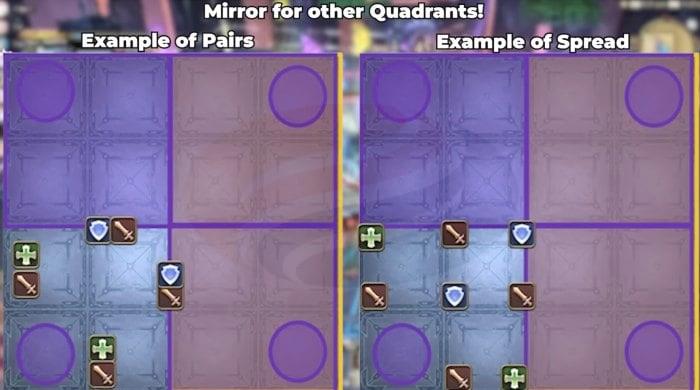
Your pairing configurations should incorporate one support and one damage specialist—pair ranged with healers and melee with tanks. A Wicked Jolt tank buster follows immediately, projecting a high-damage linear area attack. This two-strike buster inflicts vulnerability debuffs subsequently, necessitating tank exchanges for safe resolution, including the primary tank reassuming responsibility following the second impact. Strategic invulnerability usage provides effective mitigation here.
Lightning Cage
Another Electrope Edge activation follows, and as this casting initiates, prepare by dispersing into your pre-established positions and markers identical to the recent Witch Hunt mechanics. Upon cast completion, all participants receive an electrical condenser enhancement with one of two duration timers. Short-duration timers commence at 22 seconds, while extended timers begin at 42 seconds. Two players per role receive extended timers, while the remaining two acquire shortened durations. Witch Gleam then activates, striking players sequentially with each impact dealing substantial damage. Maintain precise tracking of beam impact frequency. Short-timer recipients typically experience two or three impacts, whereas extended timer holders receive one or two strikes.
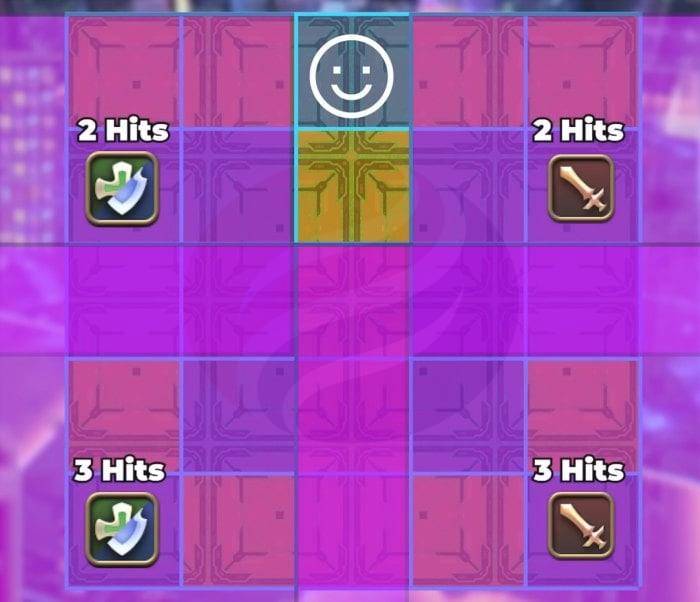
Lightning Cage manifests next, generating this precise area-of-effect configuration across the floor surface. While the pattern remains consistent between encounters, its rotational orientation varies unpredictably.
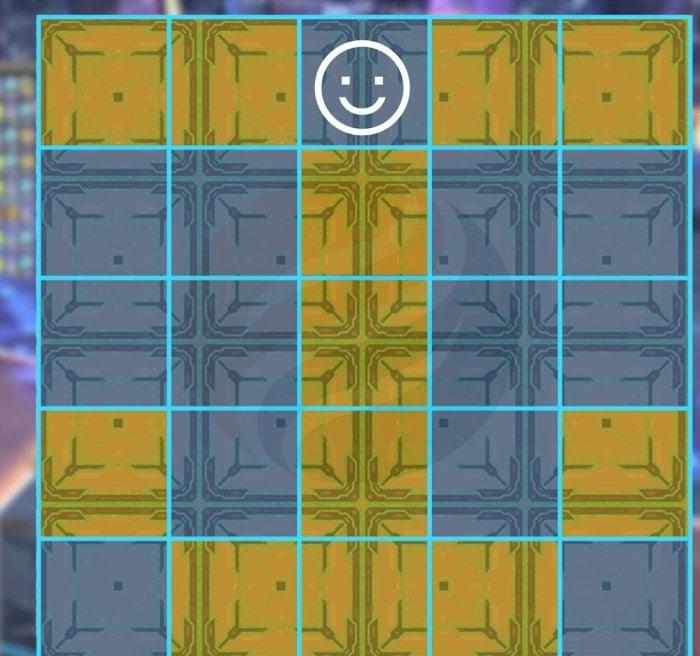
According to Rinon’s analysis, the location marked with the smiley face emblem provides safety and should serve as your destination. This position accommodates all four extended debuff holders. Upon debuff expiration, you discharge a square area explosion, with dimensions scaling proportionally based on accumulated beam impacts. Three laser strikes generate three-square expansions in each direction, while two impacts produce two-square extensions. Based on the aforementioned secure location, short-duration support players proceed leftward, short-duration damage specialists move rightward, positioning the triple-impact player in the distant corner and double-impact holder in the adjacent position.
Another Sidewise Spark follows, accompanied by identical dispersion or pairing mechanics from earlier encounter phases. As Sidewise Spark activates, rapidly transition to positions for the secondary debuff resolution sequence, identical to the initial pattern. Wicked Bolt follows with a multi-impact stack requiring comprehensive healing throughput.
Ion Cluster
Subsequently, Wicked Thunder employs Ion Cluster, teleporting northward and activating her Cannon configuration from standard difficulty, operating identically but with significantly increased damage output. Identify the secure row and relocate there promptly. An early indicator precedes the initial impact—her hitbox rotates slightly and moves opposite to the rotation direction, indicating the eventual safe row location.
You’ll additionally observe that each participant carries three stacks of this debuff. The azure designation represents negatron, while the amber signifies positron, with four instances of each debuff distributed among the raid. These must be purified during the subsequent mechanical assault sequence, or fatal consequences will occur upon timer expiration. Electron Stream initiates casting once the boss relocates to your newly constrained safe zone, with her frontal aspect charging either golden or cerulean energy while her rear charges the contrasting hue. Receiving impact from the opposing color Electron Stream removes one debuff stack but simultaneously assigns one mechanical resolution responsibility. Four participants total receive either donut-shaped buffs or dispersion enhancements. Two combatants acquire currents—either viridian or sapphire—which will shortly project pizza-slice shaped areas toward the nearest player for blue or most distant player for green. The final two players obtain violet debuffs, requiring impact from pizza-slice areas to achieve purification.
Transition
Another Wicked Jolt tank buster follows. Wicked Thunder eventually teleports centrally while facing southward. Separate into identical pairings utilized during encounter initiation, with one support and one damage specialist occupying each quadrant. Following Electrope Transplant casting, pizza-slice areas manifest. Each activation requires evasion maneuvers into secure zones. Maintain dispersion awareness. Each pairing should incorporate one melee combatant and one ranged specialist, enabling the ranged member to disengage and reposition rearward. Following five pizza-slice discharges, one participant per pair receives Conduction Point impact, immediately followed by the boss projecting Forked Fissures toward the raid. Resolution requires participants unaffected by Conduction Point circular areas to position forward, while impacted players stand behind.
After complete mechanical resolution, one additional pizza-slice manifests. Subsequently, utilize this opportunity for healing recovery before the entire sequence repeats identically. Following the ultimate pizza-slice cleave, implement substantial mitigation for subsequent raid damages and ground impacts, assembling the group southward along the boss’s hitbox perimeter. You’ll shortly transition to a separate battlefield as Wicked Thunder completes her metamorphosis, initiating the encounter’s secondary phase.
Exaflares & Wicked Special
During Phase Two, she commences with Cross Tail Switch, mitigated through tank Limit Break 3. Immediately thereafter, Exaflare trajectories materialize across the floor surface, while two players receive multi-impact stack indicators. Separate into light parties, immediately proceed to eastern and western barriers, and analyze the Exaflare formations. Each side contains one Exaflare row where every directional indicator points away from your position. Position adjacent to that row and execute evasion maneuvers into it following initial pulse resolution. These multi-impact sequences then initiate pulsing. Their substantial dimensions render initial positioning relatively flexible when transitioning onto secure rows—participants still receive impact benefits while adjacent to correct destination rows. Wicked Special initiates casting next. The boss either displays a fiery blade animation or her lightning discharge lasers. The sword impact devastates the central region, with perimeter areas remaining secure. The lightning lasers target the sides, making the middle region safe.
Mustard Bomb
The subsequent mechanic involves Mustard Bomb, featuring two tether connections originating from the boss. Tanks secure these connections and advance to frontal arena corners while activating defensive cooldowns, as these constitute tank buster attacks. The remaining group members disperse in zigzag formations across the arena behind them. Following tether resolution, they inflict Mustard Bomb debuffs on each tank, requiring transmission through physical contact to another participant, or fatal fire resistance reduction will occur. Four of the six non-tank players receive dispersion area impacts simultaneously with buster activations, leaving two designated players assuming debuff responsibility away from tanks.
For those seeking comprehensive weapons progression, our strategic approach ensures comprehensive mechanical mastery.
Aetherial Conversion
Aetherial Conversion follows, and to initiate this mechanic, Wicked Thunder channels either fire or water into her appendages. The crimson markers on the arena represent impact locations. Whichever limb illuminates first resolves initially. Simply distance yourself from incendiary zones or approach aqueous areas according to their activation sequence. When Tail Thrust completes casting, these effects activate.
Twilight & Midnight Sabbath
Next, address Twilight and Sabbath mechanics, commencing with arena contraction and four duplicates gradually materializing at northern, southern, eastern, and western positions. Two of these duplicates telegraph hemispherical assaults, consistent with both standard and initial phase patterns, establishing one quadrant as secure. Remember that the two telegraphing duplicates always appear adjacently, never oppositely, simplifying safe location identification during execution challenges. Maintain central stacking as these manifestations begin, since substantial circular areas materialize beneath each participant. Relocate to the secure quadrant once identified. Subsequently, the remaining two duplicates telegraph, establishing another secure quadrant. A Wicked Special casts simultaneously for resolution, creating one quadrant plus either perimeter or central safety simultaneously.
The subsequent mechanic involves Midnight Sabbath, initiating eight additional duplicate spawns. Separate into pairings, with healers partnering with ranged and melee accompanying tanks this iteration. Each pair monitors two duplicates to resolve mechanical requirements—one positioned cardinally and one intercardinally. The duplicates either possess cannons or wings. Cannon-equipped duplicates discharge linear areas through arena diagonals, while wing-bearing duplicates generate donut-shaped avoidance zones.
The concluding component involves the boss casting bar, displaying either Scattered Burst (dispersion) or Concentrated Burst (paired stacking). Subsequently, you must resolve the secondary duplicate, and whichever stacking or dispersion wasn’t utilized initially then activates secondarily. Wicked Special immediately follows, accompanied by another Wicked Thunder raid-wide assault.
Raining Swords
She then channels another Aetherial Conversion, displaying either fire or water and the sequential charging of each appendage, though these effects accumulate for delayed activation rather than immediate resolution. Separate into light parties and proceed to eastern and western arena boundaries. This positioning facilitates avoidance of Flame Slash traversing centrally, which demolishes the middle and divides the battlefield. Four towers materialize on each side, resolving with the Raining Swords casting.
Four blades descend on each flank, and the boss initiates chain lightning connections to them. Whichever blade remains unconnected to chain lightning provides safety, and she demonstrates each secure position twice. Four secure locations exist total, with each sword utilized once as a safe position. Your responsibility involves memorizing the sequence of non-activating swords, enabling identification of the four destination positions. Execute this mechanic along the arena periphery, since chain lightning detonations create circular areas, creating spatial constraints if remaining centrally. Following the ultimate chain lightning discharge, the arena reforms, and the accumulated Aetherial Conversion activates upon Tail Thrust casting completion, similar to previous sequences. Mustard Bomb follows again, resolved identically to the prior iteration.
Sunrise Sabbath
The arena dimensions contract into circular configuration. Subsequently, Ion Cluster applies negatron or positron stacks to each participant, with debuff durations of either 23 or 38 seconds. Four participants receive short-duration timers, while four acquire extended durations. Sunrise Sabbath casts next, rapidly generating six additional duplicates—four cannon-equipped duplicates on intercardinals and two wing-bearing duplicates on cardinals. Additionally, two towers materialize subsequently on opposing cardinals. You can anticipate spawn locations based on winged duplicate orientations. As short-duration debuff holder, your objective involves approaching a cannon duplicate possessing coloration contrasting yours and projecting energy cardinally away from towers. As extended debuff holder, your goal involves occupying towers. Cannons target the nearest participant, necessitating both beam baiting and prevention of accidental laser overlaps.
A Wicked Special involving interior or exterior positioning, followed by the secondary tower and duplicate sequence, resolved identically. Verify tower spawn positions and locate your designated cannon. The stockpiled Aetherial Conversion activates following this during the Tail Thrust sequence, and Sword Quiver follows. Separate into pairings—healers with ranged and melee with tanks—and monitor area manifestations across the floor surface. Four secure quadrants exist. Dispatch your pairs to these locations, and each will experience cleave impacts. Sword Quiver inflicts substantial damage, so maintain stacking for initial impact healing then disperse subsequently. Sword Quiver repeats twice more, then Wicked Thunder Enrage casts, signaling encounter conclusion.
Action Checklist
- Establish light party formations with ranged/healers north-south and melee/tanks on boss
- Coordinate Witch Hunt baiting sequences: supports first (tank close, healer far), then DPS (ranged far, melee close)
- Execute Electrope Edge mine management and quadrant safety identification
- Coordinate Lightning Cage debuff resolutions using smiley face safe spots
- Manage Ion Cluster cleansing mechanics with opposite-color Electron Stream impacts
- Execute tank LB3 for Cross Tail Switch and coordinate Mustard Bomb transfers
No reproduction without permission:GameCDjnh » FFXIV Arcadion: AAC Light-Heavyweight M4 Savage Guide Master Wicked Thunder's complex mechanics with expert positioning strategies and phase-by-phase execution guides