TL;DR
- Use the engraving chart tool to plan and track your 4×3 setup requirements
- Prioritize 9+9 engraving books for cost efficiency and future scalability
- Select stones based on budget and risk tolerance – cheap stones for safety, expensive for potential savings
- Configure multiple search presets and check all jewelry combinations to find the best deals
- Manage negative effects strategically by incorporating them into your chart calculations
- Optimize combat stats with budget-friendly alternatives that minimize performance loss
Mastering the Auto-Chart tool is essential for efficiently building your engraving setups, whether you’re aiming for 3×3, 4×3, or even planning ahead for 5×3 configurations. This comprehensive guide will walk you through every step of the process.
Chart Explained
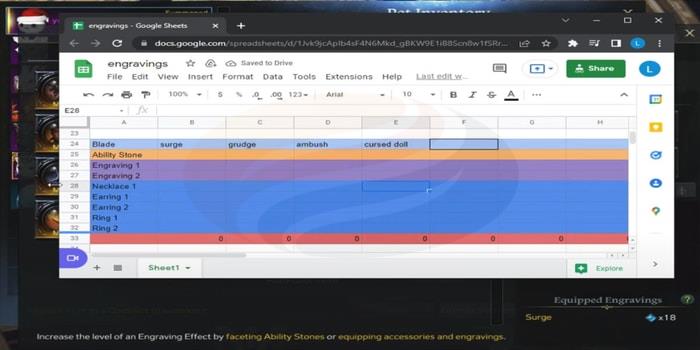
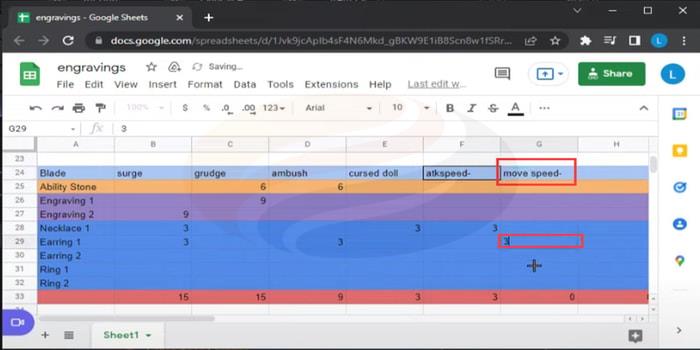
The engraving chart serves as your primary planning tool for identifying compatible jewelry pieces across various setup requirements. This visual interface dramatically simplifies the complex process of engraving optimization.
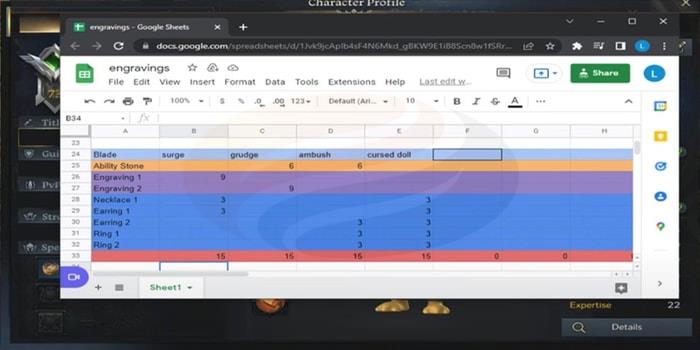
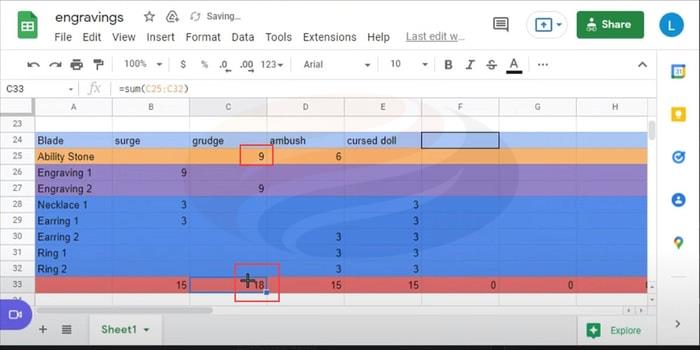
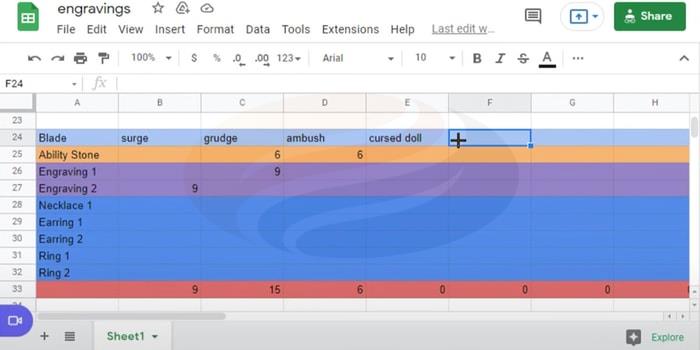
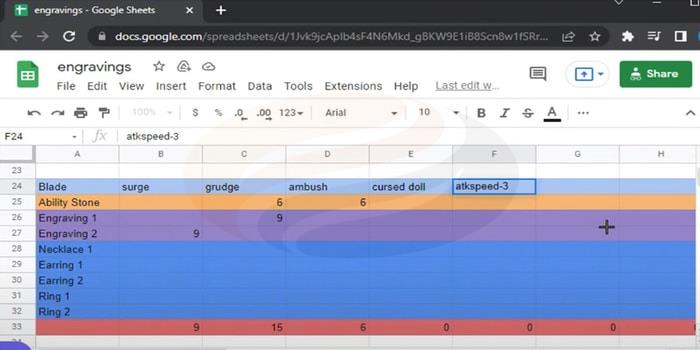
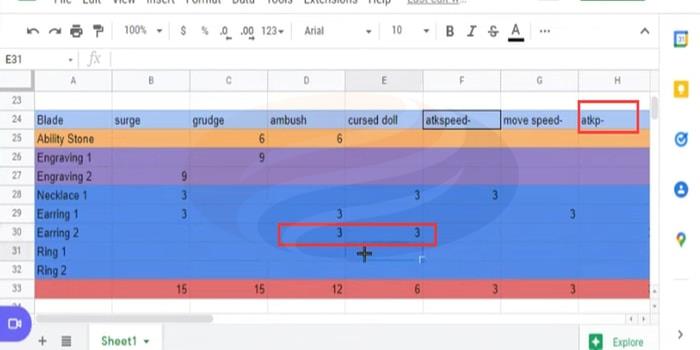
Notice the red indicator bar displaying four instances of +15 values. Each +15 represents a fully maximized engraving, indicated by the 15 blue diamond symbols. The top section showcases your primary engravings—Surge, Grudge, Ambush Master, and Cursed Doll—while the upper left corner identifies your specific class (Blade in this example). The sidebar comprehensively displays all necessary components for achieving 4×3: complete jewelry sets, dual engraving configurations, and your ability stone. Simply click any numerical value to modify it—changing this 9 to a different value automatically updates the corresponding total to 18 below.
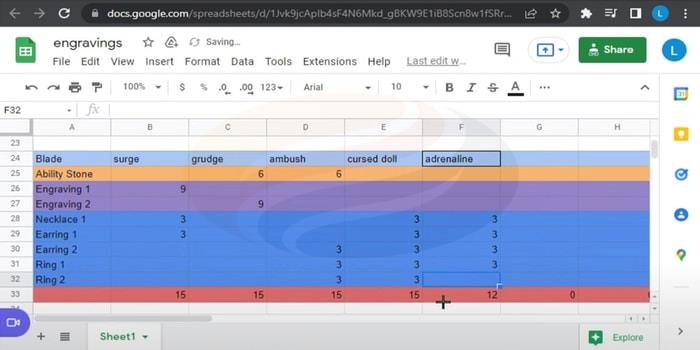
Planning for future 5×3 setups becomes straightforward—just input additional engravings like Adrenaline and progressively build toward your advanced configuration.
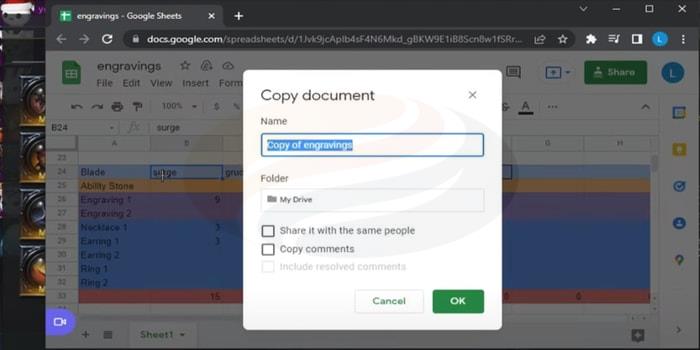
Access the template through this link: https://docs.google.com/spreadsheets/d/1zp1ypMR0XwLWvjmzV8n4M9tDZ9WvsL9GjGNQyiqWmBE/edit#gid=0. To begin, navigate to File, select Make a Copy, and confirm the action.
I’ll demonstrate by completely resetting the chart interface. This represents how your initial chart should appear before customization.
Remember that engraving names and class requirements will vary significantly across different character builds and playstyles.
9+9 Engraving Books
Establishing your foundation with +9/+9 engraving books represents the most cost-effective approach for 4×3 configurations. While +12 books offer superior efficiency for future 5×3 setups, they’re unnecessary expenditures for current 4×3 requirements.
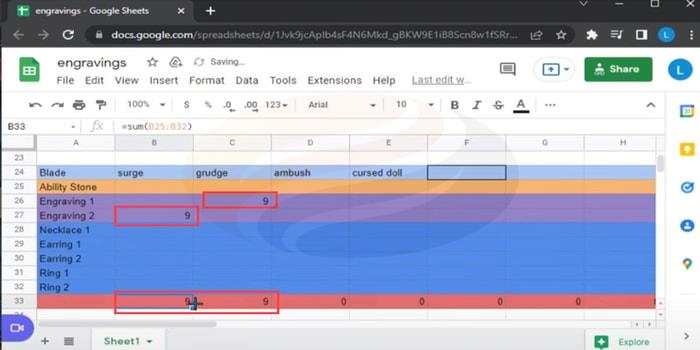
For optimal class performance, prioritize obtaining +9 on your class-specific engraving followed by +9 on Grudge. Approximately 99% of optimized builds incorporate Grudge due to its substantial damage amplification. The remaining 1% typically invest in their most expensive secondary engraving, such as Cursed Doll in this example.
Returning to our chart interface, input your +9 values for both Grudge and your class engraving. Observe how the red indicator bar now reflects your +9/+9 foundation.
Pro Tip: Always purchase engraving books during market downturns or events when prices typically drop 20-30%. This timing strategy can save thousands of gold across your entire roster.
Stone
Ability stone faceting presents three primary success thresholds: 6/6 as the most budget-friendly option, 7/7 for balanced value, and the nearly impossible 9/7 combination that offers maximum efficiency.
You face two distinct stone acquisition strategies: premium combinations like Grudge/Adrenaline or economical options such as Cursed Doll/Ambush Master.
Evaluate the risk-reward dynamics carefully. Budget stones minimize financial risk—repeated failures incur minimal losses. Premium stones offer substantial gold savings if successful but carry higher failure costs.
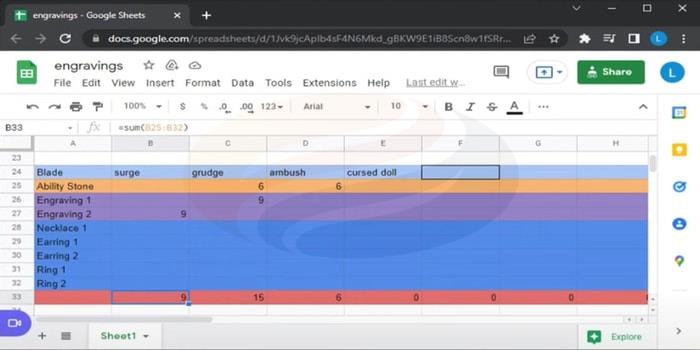
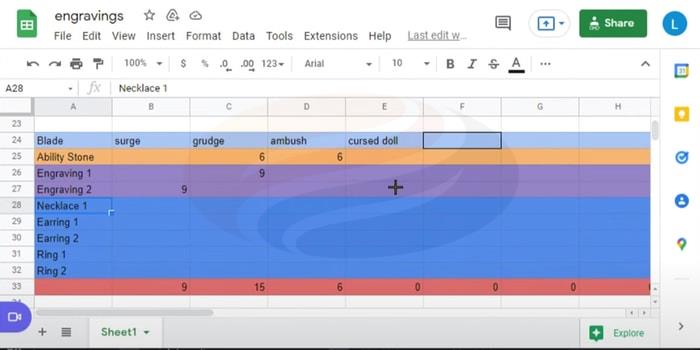
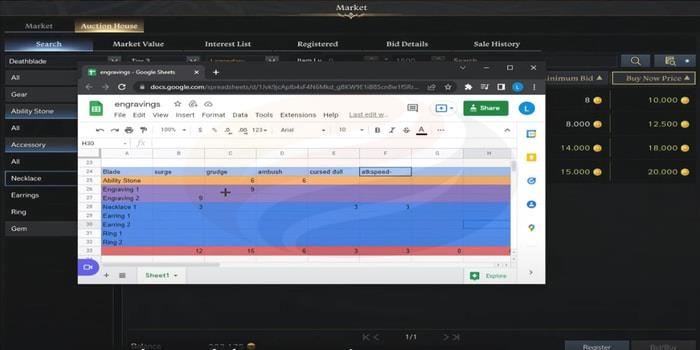
For illustration: achieving 6/6 on Grudge/Adrenaline means Grudge becomes fully maximized, eliminating its requirement from your jewelry pieces. Returning to our chart with a Grudge/Ambush Master stone at 6/6 demonstrates one engraving reaching the +15 maximum, leaving three remaining to complete.
Common Mistake: Many players overspend on stones attempting 7/7 or higher when 6/6 provides identical functionality for 4×3 setups at a fraction of the cost.
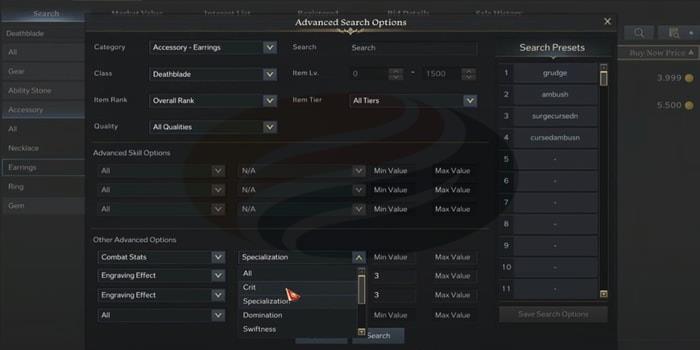
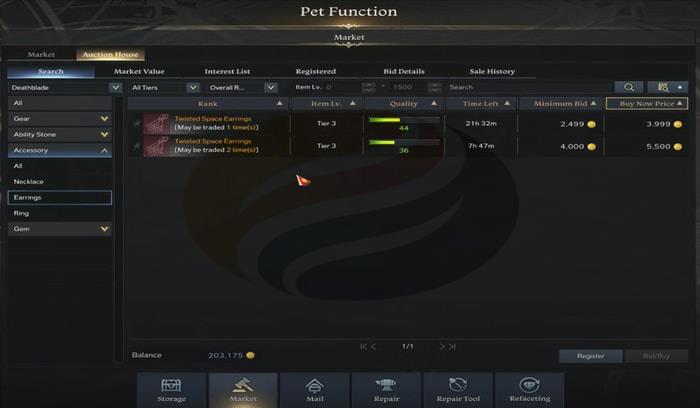
Jewelry – Search Presets (Important)
With stone selection completed, we progress to the most complex phase: jewelry acquisition. Prioritize necklaces initially—acquiring earrings and rings first severely limits your necklace options, dramatically increasing their market price.
Necklaces offer multiple viable combinations: Surge/Ambush Master, Surge/Cursed Doll, or Ambush Master/Cursed Doll combinations.
Implement comprehensive search presets covering all potential jewelry variations. Market prices fluctuate significantly—what’s expensive today might be affordable tomorrow. Establish monitoring routines rather than purchasing everything simultaneously.
Advanced Strategy: Create search alerts for undervalued combinations. Players often overlook certain pairings, creating opportunities for substantial savings if you maintain persistent market surveillance.
Negative Effects on Jewelry
Negative effects present both challenges and opportunities. Items with detrimental modifiers typically sell at significant discounts—sometimes 40-60% below market value for equivalent stat combinations.
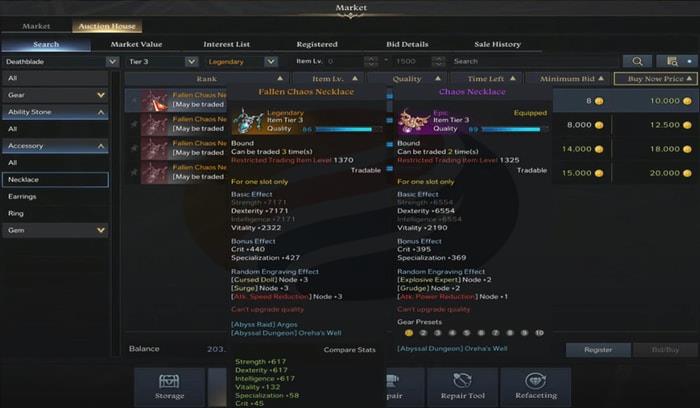
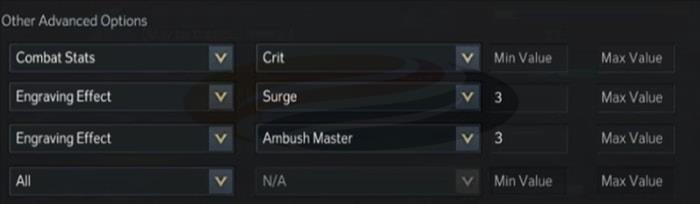
Strategic negative effect management requires precise chart configuration. Identify the specific negative modifier—in this case, Attack Speed Reduction on the Fallen Chaos Necklace.
Configure your search parameters to include “attack speed -3” or similar negative effect designations.
After acquiring the Fallen Chaos Necklace, input its attributes into your chart: +3 Surge, +3 Cursed Doll. Observe how Surge now requires only 3 additional points to reach maximum activation.
Performance Note: Most negative effects have minimal practical impact on combat performance, making them excellent value propositions for budget-conscious players.
Combat Stats (Save Lots of Gold)
Combat stat distribution represents one of the most nuanced aspects of engraving optimization, with requirements varying dramatically by class specialization.
When operating with limited gold reserves and needing to complete your 4×3 setup urgently, consider incorporating Crit pieces strategically.
Class-specific stat priorities dictate optimal combinations. For Specialization-focused builds like Blade, substituting one Crit earring can generate substantial gold savings since Specialization jewelry consistently commands premium prices.
Examine earring options for Surge/Ambush Master combinations. Specialization variants typically start around 5,000 gold, while Crit alternatives may be available for just 200 gold—representing 96% cost reduction for minimal performance trade-offs.
For Mayhem Berserker builds utilizing Crit/Swiftness combinations, Swiftness jewelry typically costs significantly less than Crit variants.
Damage Calculation: The typical damage loss from substituting one Crit piece ranges between 2-4% depending on your specific build and combat rotation efficiency.
Finishing 4×3 Setup
Having covered combat stats, search optimization, and negative effect management, we now complete our 4×3 configuration. For gold conservation purposes, I’m selecting a Crit-based earring with Surge and Ambush Master attributes.
This piece includes +3 negative effects on movement speed. We’ll configure it as Surge 3, Ambush Master 3, Movement Speed reduction, and input the corresponding values.
With Surge and Grudge now fully maximized, we require only Ambush Master and Cursed Doll completion. Remember to consistently verify all available piece variations—observe this example.
We’ve identified an Ambush Master/Cursed Doll +3 piece with Specialization for 4,000 gold. Comparative analysis shows the next cheapest option at 5,000 gold—a 25% premium for identical functionality.
Consistently examine every potential combination variation. This particular piece offers Ambush Master 3 and Cursed Doll 3 with Attack Power Reduction negative effect.
By this stage, you should comprehend the fundamental principles. Only two additional +3 pieces remain necessary to complete the configuration.
Taking Advantage of Chart
Always finalize your engraving chart configuration before purchasing jewelry pieces. Implement thorough double-verification procedures to ensure accurate 4×3 configuration on your jewelry planning interface.
Additionally, for those seeking deeper understanding, explore LuisNoLimit’s video content since this guide incorporates concepts from his educational materials.
Expert Insight: The most common error players make is purchasing pieces without completing their chart first, resulting in incompatible combinations that waste thousands of gold.
Action Checklist
- Access and copy the engraving chart template from the provided Google Sheets link
- Configure +9/+9 engraving books based on your class requirements
- Select ability stone strategy based on budget and risk tolerance
- Configure multiple search presets covering all jewelry combination possibilities
- Prioritize necklace acquisition while monitoring all jewelry market variations
- Integrate negative effects strategically into your chart calculations
- Verify final chart configuration before purchasing any jewelry pieces
No reproduction without permission:GameCDjnh » The Most Efficient Way to Get 4×3 Engravings on Lost Ark with Auto-Chart Master Lost Ark engraving optimization with this comprehensive guide to 4x3 setups and gold-saving strategies