TL;DR
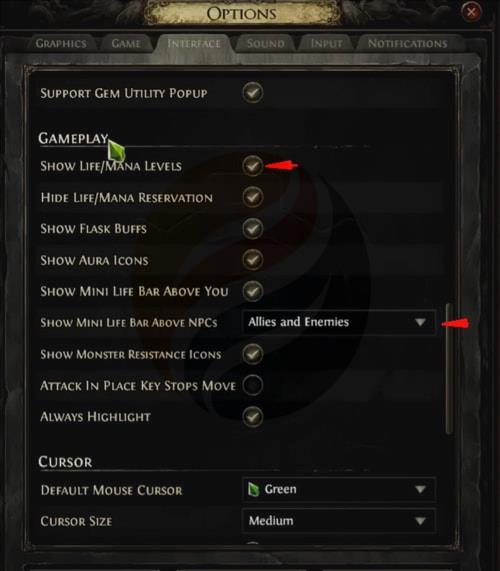
- Configure interface to show life/mana values and highlight items for optimal navigation
- Prioritize movement speed gear like Foxshade and Wanderlust over defensive stats
- Use shield charge and free basic skills to maintain speed while conserving mana
- Manipulate checkpoints to respawn enemies for free experience gains
- Complete plus icon quests for permanent character buffs and skill points
Embarking on the Path of Exile 2 campaign requires strategic preparation to achieve the impressive 7-hour completion time demonstrated by Kripparrian. The foundation of efficient speedrunning begins with meticulous interface configuration that eliminates unnecessary delays and streamlines navigation throughout your journey.
Begin by activating critical display options in your settings. Enable numerical life and mana value displays rather than relying solely on visual bars. Turn on mini life bars above all NPCs, including both allies and enemies, to maintain situational awareness. Most importantly, configure item highlighting to always display ground loot, which simultaneously reveals vendor locations and waypoints for rapid interaction.
Equipment choices dramatically impact your campaign completion speed. Focus on acquiring specific leveling uniques that provide disproportionate benefits for speedrunning. Foxshade stands out as the premier armor choice due to its exceptional evasion rating combined with movement speed enhancement.
Understanding armor mechanics is crucial – heavy armor pieces impose movement speed penalties through a multiplier system. Foxshade avoids this penalty entirely by providing evasion instead of armor, making it the only armor in the game with both excellent stats and movement speed benefits.
For offensive power, prioritize Pillar of the Caged God or Widowhail Crude Bow to maintain damage output. Wanderlust Wrapped Sandals provide a non-negotiable 20% movement speed increase. Prioritize gear with skill level modifiers over resistance stats during campaign progression, as you can afford to die in softcore mode. If resources permit, seek amulets with Battle-Hardened Anoint for 20% reduced critical damage, 20% increased armor and evasion, and 5% strength and dexterity bonuses.
Skill choices must align with campaign-specific requirements. Heralds of Ice excel at clearing trash mobs efficiently through their automatic trigger mechanics. Incorporate physical damage skills to exploit the reduced stun threshold of campaign monsters compared to endgame mapping content.
Movement skills are non-negotiable for speedrunning. Maintain a weapon swap with a shield specifically for Shield Charge, available from low levels. This skill combines attack speed and movement speed for rapid traversal and can be canceled or redirected mid-use for precision navigation.
Leverage free basic weapon skills that bypass mana constraints, allowing you to socket powerful support gems without worrying about mana multipliers. Quarterstaff strike and mace strike provide the highest single-target damage among cooldown-free abilities.
Passive tree allocation should prioritize damage nodes initially, focusing on multiplier damage over additive damage since you begin with minimal additive damage sources. Resistance penetration nodes provide immediate value during campaign despite being inefficient in endgame, where curses and exposure offer superior damage amplification.
Movement speed and action speed (the new Path of Exile 2 stat encompassing cast and attack speed) should be acquired where available, though they’re typically limited on the passive tree.
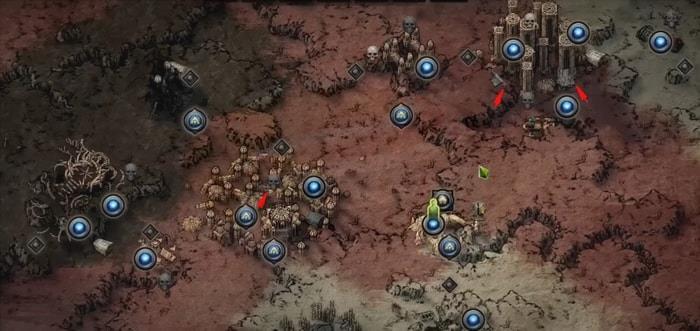
Press U to access the world map and identify icons marked with plus symbols. These represent quests offering permanent character enhancements including additional skill points, percentage health increases, and resistance bonuses that significantly impact your progression speed.
Master checkpoint manipulation to optimize experience gain and reduce travel time. After completing objectives in an area, instead of manually traveling to the next location, use the “Respawn at Checkpoint” function from the escape menu.
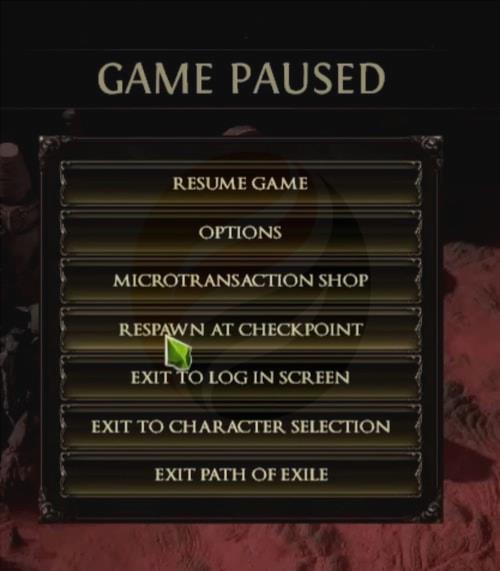
This technique respawns all enemies while maintaining your progression. With an efficient build, you can eliminate these respawned mobs without sacrificing movement pace, effectively converting backtracking time into free experience points.
Teleportation between activated checkpoints doesn’t reset the map, creating powerful synergy with the respawn technique. Always activate checkpoints when encountered, as nearly all quests incorporate checkpoint systems.
Town visits should be optimized for maximum efficiency. Vendor inventories may contain appropriate gear upgrades for your current level. Use control-click for instant purchases and control-left-click on The Hooded One for rapid item identification.
Implement efficient trading practices by utilizing the search functionality. Input terms like “rare” to filter for specific item types. For gambling vendors, focus on amulets and rings since these slots often remain unfilled during early campaign progression.
Any ring or amulet with modifiers represents a straightforward upgrade if you have empty equipment slots. This approach minimizes time spent on gear optimization while ensuring consistent character power progression.
Ascendancy progression requires completing the Trial of the Sekhemas (Sanctum) for your first ascendancy and Ultimatum Trials for the second. Note that relics aren’t shared between characters, requiring muling between characters if starting fresh.
Generally, prioritize relics providing resistance bonuses. For initial characters or those lacking comprehensive relic collections, utilize chest rewards and bronze keys to open Relic Coffers for additional relics.
Understanding level breakpoints is crucial for efficient ascendancy completion. The third ascendancy point becomes available at area level 70, while the fourth requires area level 75. Although you can attempt these trials at higher levels (up to 80), completing them at the minimum required level ensures enemies have reduced health and damage output.
Action Checklist
- Configure interface to show numerical life/mana values and highlight all items
- Acquire Foxshade armor and Wanderlust boots for movement speed optimization
- Set up weapon swap with shield for Shield Charge movement skill
- Complete all plus icon quests for permanent character buffs
- Practice checkpoint manipulation for experience optimization
- Complete Trial of the Sekhemas at area level 70 for third ascendancy point
No reproduction without permission:GameCDjnh » How to Quickly Run the PoE 2 Campaign – Equipment & Skills and More Master Path of Exile 2 campaign speedrunning with expert strategies, gear optimization, and time-saving techniques