TL;DR
- Learn precise positioning for Quadruple Crossing cleaves and diagonal movement patterns
- Master the Nine Lives buff system that stores mechanics for later clone execution
- Execute the Mouser tile dodging system using the 4-to-3 visual reference method
- Coordinate role-specific responsibilities during Nailchipper and Raining Cats phases
- Optimize DPS to potentially skip final mechanics and secure the clear
Confronting the Black Cat in AAC Light-heavyweight Savage presents a formidable challenge that demands exceptional coordination and mechanical precision. This encounter serves as the gateway to the tier’s most demanding content, requiring teams to execute complex patterns with flawless timing. Drawing from Hector Lectures’ comprehensive analysis, this guide breaks down each phase with actionable strategies to transform this daunting fight into a manageable victory.
For adventurers seeking immediate progression, professional boosting services like MmoGah offer reliable AAC Light-heavyweight Savage completion with guaranteed results.
Quadruple Crossing
The encounter initiates with Quadruple Crossing, a targeted cleave assault aimed at the four closest players. Designate your entire DPS roster to absorb the initial volley, then rotate assignment for the subsequent repetition to ensure tank healers properly bait the attack. This mechanic repeats identically in the same positions, requiring consistent evasion patterns from your team.
Common Mistake: Failing to rotate players for the second cleave often results in unnecessary vulnerability stacks and potential fatalities.
Double One-two Paw
Biscuit Maker delivers a devastating two-strike tank buster that applies vulnerability debuffs, necessitating either strategic tank swapping or invulnerability cooldown usage. The boss then casts Nine Lives, granting a buff that stores subsequent mechanics for delayed execution. One-Two Paw follows with familiar normal mode patterns – two consecutive cleaves requiring sequential dodging. Crucially, this pattern gets memorized by the boss for later deployment, so your team must consistently recall which side provided safety (typically left).
Soulshade summons two clones that absorb the One-Two Paw mechanics. These duplicates will simultaneously execute the stored pattern later, requiring positioning to the left of both entities.
Advanced Tip: Designate a dedicated caller to track stored mechanics since visual confirmation becomes unreliable during complex phase transitions.
Following another Nine Lives cast, both clones discharge their initial cleaves. Execute a diagonal movement directly through the boss to the right side of both clones for evasion. This immediately transitions into either Double Swipe (light party stacks) or Quadruple Swipe (partner pairs), with this resolution method also being stored for future clone deployment.
Mouser 1
Mouser reintroduces the red tile destruction mechanic from normal mode but with significantly reduced pattern variations. Master two primary evasion sequences: position on tile 4 while monitoring tile 3. If tile 3 suffers one impact, transition directly from 4 to 3. If tile 3 endures two strikes, execute a two-step dodge: first to tile 3, then immediately to tile 2 as destruction progresses.
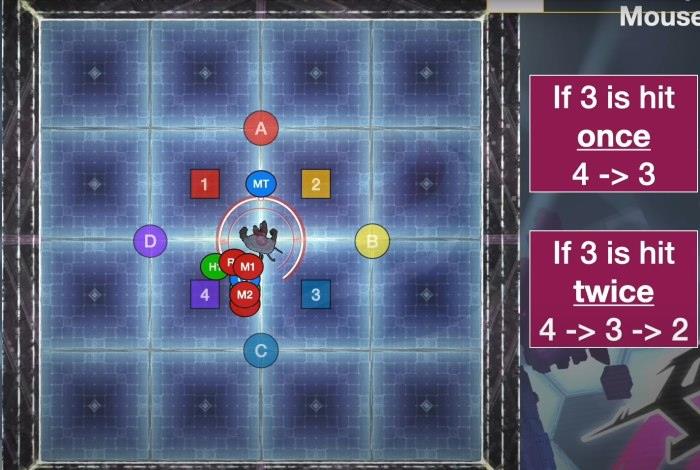
As tiles sequentially shatter, time your movements to reach tile 3 immediately upon its destruction, then proceed to tile 2 when it breaks.
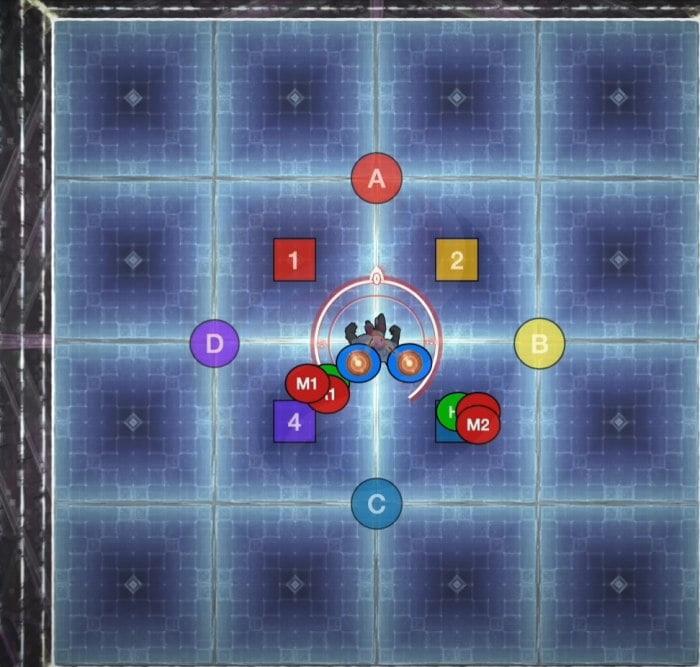
Copycat then repairs four tiles and spawns a clone that executes punch mechanics with enhanced complexity. Targeting alternates between all tank/healers or all DPS simultaneously. Watch for two distinct animations: the kneeling uppercut preparation (normal knockback) or the overhead slam setup (positional impact).
Critical Adjustment: Unlike normal mode, knockback direction is player-controlled – face your desired landing spot. Additionally, all other players must position diagonally from the targeted individual since horizontal and vertical tiles relative to them emit lethal knockback AoEs.
The clone teleports and strikes the designated player, fracturing their landing tile. Diagonal positioning ensures safety from knockback effects. Subsequent targets may trigger the overhead slam variation, requiring positioning on fully repaired tiles since no knockback occurs.
Clones Shenanigans
Another Nine Lives precedes Leaping One-Two Paw, resolved with normal mode tactics. Both the leap and cleave patterns become stored buffs for future clone utilization. Remember safe zones by inside/outside positioning rather than left/right as orientations will reverse.
Soulshade summons a central clone executing Leaping One-Two Paw. The leap orientation corresponds to the clone’s facing direction – monitor buff indicators for actual movement vectors. Subsequent Nine Lives and Leaping Quadruple Crossing follow established procedures, with both mechanics stored for later deployment.
The boss tethers randomly to one clone while preparing its mechanic. It executes One-Two Paw with a one-tile jump displacement. Position inside recalling inside-safe-first protocol. Split light parties with group one north and two south to accommodate Tempestuous Tear’s dual line stacks.
Mouser 2
Another Bloody Scratch raid-wide precedes the second Mouser iteration. Apply the established 4-to-3 visual reference system, then progress through Copycat’s clone spawn and punch sequences. Since healers were targeted initially, DPS now receive focus.
A DPS targeted for punching positions accordingly while others maintain diagonal spacing. Two potential mechanics follow: Overshadow (group line stack) or Splintering Nails (role-specific conal AoEs requiring tank-left, DPS-right, healer-middle formations.
Raining Cats
After completing preceding mechanics, Raining Cats demands specific preparation. Hector’s recommended formation places light party one near or in the hitbox while light party two positions slightly outside. Two tanks claim tethers before their respective groups.
Positioning Critical: The nearest and farthest players relative to the boss receive shared damage AoEs – these must be players WITHOUT tethers as tethered individuals taking this damage will perish.
Execute with one player from light party one inside the hitbox and one from light party two well outside it. Both tether-bearing players stand directly on the hitbox. After cone and stack resolutions, rotate assignments maintaining identical positions until all members have handled tethers once.
Predaceous Pounce
Copycat summons our final northern clone mechanic, combining familiar AoE patterns with paw print indicators. With optimized damage output, teams may entirely skip this phase. While evading, maintain proximity to the north-south axis since the boss integrates One-Two Paw simultaneously. Dodge to the safe side while avoiding all AoEs, using gap closers for optimal positioning during the rapid side-switch cleaves.
The concluding Mouser phase intensifies with excessive tile destruction leaving minimal safe zones. Prioritize survival by remaining on melee tiles while pushing final damage to eliminate the boss before your last platform disintegrates.
Action Checklist
- Assign DPS to initial Quadruple Crossing, then rotate tanks/healers for second cleave
- Execute tank swap or invulnerability for Biscuit Maker tank buster
- Track Nine Lives buffs and memorize stored mechanics for clone phases
- Practice Mouser tile dodging using 4-to-3 reference system
- Coordinate diagonal positioning during Copycat punch mechanics
- Execute Raining Cats tether rotation ensuring non-tethered players take shared damage
No reproduction without permission:GameCDjnh » FFXIV Arcadion Savage M1 Guide – How to Beat the Black Cat Master the Black Cat's complex mechanics with expert strategies for AAC Light-heavyweight Savage success