TL;DR
- Nightblade Assassination + Necromancer Grave Lord creates the strongest subclass bomber combination
- Dark Convergence enables larger bombs than Rush of Agony despite requiring combat entry
- Master the Proxy Det + Colossus combo timing for maximum area damage output
- Stage 3 Vampire with Khajiit race provides optimal stat distribution
- Always finish cleaves with dodge roll and cloak for successful escape
The arrival of Update 46 in The Elder Scrolls Online brings significant adjustments that reshape PvP combat dynamics, particularly for bomber specialists. While the subclassing system doesn’t fundamentally alter core gameplay mechanics, it unlocks innovative build possibilities for veterans seeking fresh tactical approaches. This comprehensive guide from expert player cujokills details a devastating Subclass Bomber configuration designed to secure battlefield dominance through calculated area-of-effect devastation.
Strategic Insight: Elevating your PvP effectiveness typically demands investment in specialized equipment, ability enhancements, and consumable resources, many of which can be acquired using The Elder Scrolls Online gold currency. These strategic investments dramatically enhance your combat performance and competitive edge in player-versus-player engagements.
Stealth Mechanics Overhaul
A pivotal modification impacting bombing tactics involves the complete removal of stealth capabilities while Banner Bearer remains active. This restriction prevents cloaking, stealth potion usage, and crouch-based invisibility when this ability is equipped. Consequently, bomber configurations that previously depended on Banner Bearer stealth initiation have become substantially less effective. However, this design change liberates valuable skill bar real estate for alternative tactical options.
Common Mistake Alert: Many players attempt to maintain outdated stealth-bombing patterns post-update, resulting in predictable failures. The new meta demands aggressive positioning and timing precision rather than reliance on invisibility mechanics.
When configuring your subclass specialization, you maintain flexibility to select combinations matching personal preferences, though the most potent damage-oriented pairing combines Nightblade and Necromancer class lines.
Nightblade’s Assassination Skill Line: This ability tree provides exceptional damage-enhancing passives, featuring a redesigned Master Assassin passive that now boosts critical strike probability rather than penetration values. This transformation establishes Assassination as essential for damage optimization.
Necromancer’s Grave Lord Skill Line: This specialization includes one of the most powerful ultimate abilities for bombing operations, complemented by passives that augment critical chance and deliver penetration bonuses, creating perfect synergy with Nightblade capabilities.
The tertiary skill line selection hinges on individual playstyle preferences:
For players favoring durable configurations (similar to conventional 30,000 health Necromancer bombers or Sorcerer bombers), bypassing the Shadow skill tree becomes viable.
In optimized damage-focused builds, the Shadow skill line becomes mandatory for cloak accessibility, delivering crucial passives including resource recovery, maximum health augmentation, and damage mitigation.
By selecting Assassination, Grave Lord, and Shadow combinations, you necessarily sacrifice the Siphoning skill line, forfeiting Soul Tether access. Despite this line receiving enhancements (such as the Catalyst passive elevating ultimate generation to 30 points), cloak functionality remains more critical for survival sustainability.
Advanced Optimization Tip: The 10-stack capability on Relentless Focus enables substantially increased damage against clustered opponents compared to the previous 5-stack limitation.
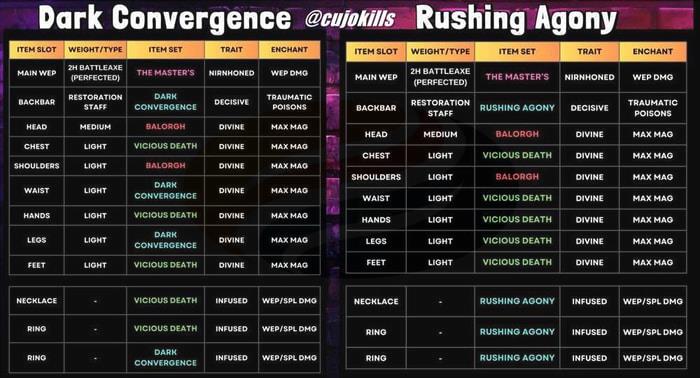
Selecting appropriate equipment proves fundamental for any bomber configuration. Here’s analytical comparison between two prevalent set options:
Rush of Agony
• Reduced ability cooldown
• Absence of visual telegraphing
• Combat status unnecessary for activation
• Doesn’t trigger crowd control immunity
• Limited target pull capacity
Dark Convergence
• Extended cooldown duration
• Clearly visible activation indicator
• Requires combat engagement for functionality
• Applies CC immunity to affected targets
• Unlimited pull potential
Most players gravitate toward Rush of Agony, though its inherent pull quantity restriction curtails bombing effectiveness.
Dark Convergence, despite lower popularity, facilitates more extensive bombing operations, making it better suited for this specific build architecture. To achieve combat status for Dark Convergence activation, execute a rapid light attack immediately before initiating the pull sequence.
Execution Timing: Proper Dark Convergence utilization requires precise sequencing: light attack to enter combat, followed immediately by pull activation within the same global cooldown window.
Front Bar Skills
Healing Burst, Forward Momentum, Camo Hunter, Brawler, Relentless Focus, and Soul Harvest (Ultimate).
For the primary weapon bar, implement a Familiar configuration featuring Soul Harvest as your Ultimate selection. This represents a passive Ultimate ability requiring no active activation. When equipped in skill slots, it generates Ultimate points passively.
Relentless Focus now accumulates up to 10 stacks rather than 5, permitting amplified damage output against grouped adversaries. Utilize Relentless Focus for maximum damage potential or Merciless Focus for supplementary healing capabilities.
Back Bar Skills
Concealed Weapon, Unnerving Boneyard, Proxy Det, Shadowy Disguise, Race Against Time, and Pestilent Colossus (Ultimate).
On the secondary weapon bar, employ Pestilent Colossus as your Ultimate selection and primary pull mechanism. If preferring a gentler pull approach—one capable of triggering Dark Convergence without Ultimate expenditure—consider Unnerving Boneyard as an alternative. This ability additionally applies major breach status, enabling more effective enemy defense penetration.
If capable of executing rapid bar transitions, you can activate Unnerving Boneyard and Pestilent Colossus nearly simultaneously before switching to your primary bar for cleave execution. This sequence delivers maximum achievable damage output.
However, if bar switching presents technical challenges, contemplate transitioning to Glacial Colossus for stun application. This approach provides extended time windows for cleave completion. Nevertheless, for most players, strongly recommended to slot Mystic Siphon replacing Unnerving Boneyard for passive 3% damage enhancement. Mystic Siphon requires no activation; simple slot allocation suffices.
Mystic Siphon operates as a soft pull mechanism for Dark Convergence, meaning ground-based corpses enable pull activation. Alternatively, utilize it from distance for rapid resource recovery.
Concealed Weapon provides mobility and defensive benefits. When securely positioned within keeps awaiting bombing opportunities, exchange it for Fiery Contingency to boost damage further.
Rotation Execution Patterns
1. Initiate by crouching and applying buffs using Healing Burst.
2. Activate Momentum and execute bar transition.
3. Apply buffs with Race Against Time and activate Proxy Det simultaneously with Alliance Spell Draught potion consumption.
4. Await Proxy Det countdown reaching 2 seconds, then perform light attack to achieve combat status.
5. Deploy Boneyard, followed by Colossus.
6. Switch bars and execute cleave spam.
Expert Technique: Consistently conclude cleave sequences with dodge roll execution, then attempt cloaking and disengagement.
If utilizing Colossus and Contingency combinations:
1. Apply buffs and transition bars.
2. Reapply buffs, then utilize Proxy Det initially.
3. Activate Contingency, followed by stealth potion consumption (Contingency should consistently represent the final ability activated).
4. Execute light attack, deploy Colossus, then switch bars for cleave spam execution.
Warfare
Fighting Finesse (slot)
Master-at-Arms (slot)
Biting Aura (slot)
Backstabber (slot)
Fitness
Celerity (slot)
Bastion (slot)
Boundless Vitality (slot)
Thrill of the Hunt (slot)
Basic Build Information
Race: Khajiit
Attributes: 64 points allocated to Magicka
Vampire or Werewolf: Stage 3 Vampire status
Mundus Stone: The Shadow
Food: Bewitched Sugar Skulls
Potion: Alliance Spell Draught formulation
Stat Sheet Analysis
Maximum Magicka: 32,229
Maximum Health: 22,979
Maximum Stamina: 18,392
Magicka Recovery: 1,336
Health Recovery: 284
Stamina Recovery: 1,200
Spell Damage: 7,038
Spell Critical: 45%
Spell Penetration: 25,270
Weapon Damage: 7,038
Weapon Critical: 51%
Physical Penetration: 25,270
Spell Resistance: 18,407
Critical Resistance: 1,320
Physical Resistance: 14,051
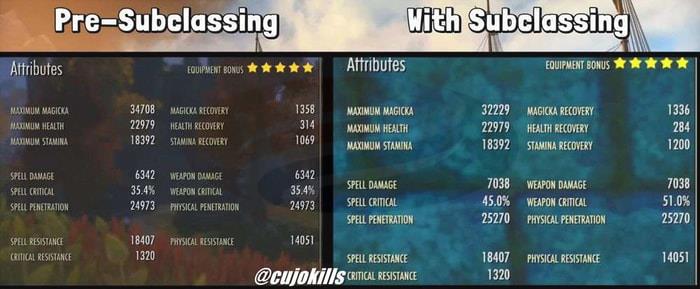
These statistical values represent character status when fully enhanced by the 500 ultimate bomb capability, emerging from stealth with passive abilities active, and complete Grim Focus stack accumulation. When contrasting with pre-subclassing statistics, observe that this subclass configuration sacrificed marginal Maximum Magicka, though damage output, critical strike probability, and penetration metrics all demonstrate improvement.
The Subclass Bomber configuration introduced through Update 46 delivers not only exceptional power but also tremendously engaging gameplay dynamics. While Banner Bearer modifications constrain traditional stealth-bombing methodologies, they unveil innovative opportunities for creative build development. By integrating Nightblade’s Assassination capabilities with Necromancer’s Grave Lord functionalities and harnessing Dark Convergence equipment potential, you possess all necessary components for PvP battle supremacy.
Whether infiltrating enemy strongholds or unleashing catastrophic area-effect devastation upon unprepared opponents, this build provides superior damage delivery and tactical adaptability. For comprehensive guidance on mastering ESO’s combat systems, explore our Complete Guide to advanced tactics and strategies.
Critical Success Factor: Master the 2-second Proxy Det timing window—this critical execution phase determines successful bomb detonation versus premature enemy dispersion.
Equip your character, refine rotation precision, and prepare to establish your legacy throughout Tamriel!
YOU MAY ALSO LIKE:
ESO Console Add-Ons – Everything You Need to Know
ESO: Crossplay and Enhancement to Overland Difficulty Are On the Way
Best Skill Lines for Subclass Solo Builds in ESO
Action Checklist
- Configure subclass with Nightblade Assassination + Necromancer Grave Lord + Shadow skill lines
- Acquire Dark Convergence gear set and optimize stat distribution
- Practice Proxy Det + Colossus combo timing in controlled environments
- Master combat entry light attack into pull sequence execution
- Execute full rotation in live PvP scenarios with escape protocols
No reproduction without permission:GameCDjnh » ESO Subclass Bomber PvP Build – Update 46 Master ESO's new Subclass Bomber build with optimized skill combinations, gear strategies, and PvP execution techniques