TL;DR
- Monster sets provide crucial two-piece bonuses that significantly boost DPS output in endgame content
- Kjalnar’s Nightmare and Zaan dominate single-target scenarios with unique mechanics
- Stormfist and Nerien’eth offer exceptional AoE damage with reliable proc conditions
- Class-specific synergies like Sorcerer with Maw of the Infernal create powerful combinations
- Proper positioning and ability selection are essential for maximizing set effectiveness
In The Elder Scrolls Online, Monster sets represent specialized two-piece armor configurations consisting exclusively of Head and Shoulder components. The Head pieces are exclusively obtained by defeating the final encounter in veteran difficulty dungeons, while Shoulder pieces require acquisition through Undaunted Pledge Masters using Undaunted keys earned from daily pledges.
Players can alternatively purchase Head and Shoulder pieces of Monster sets using substantial amounts of ESO currency from the unique Khajiiti vendor, Adhazabi Aba-daro. Head pieces appear less frequently in her inventory compared to Shoulders, with two distinct styles of either Heads or Shoulders rotating each weekend.
Monster sets are designed to enhance and complete players’ overall armor arrangements. Their specialized bonuses prove exceptionally valuable and often essential for tackling challenging end-game activities. Determining which Monster set delivers optimal performance or generates maximum damage represents common inquiries among the community.
The development team has successfully balanced numerous options to create multiple “best” choices depending on specific combat situations. The responsibility falls upon players to deploy these sets in appropriate scenarios. Esteemed content creator Skinny Cheeks compiles his preferred Monster sets for damage-dealing roles in ESO.
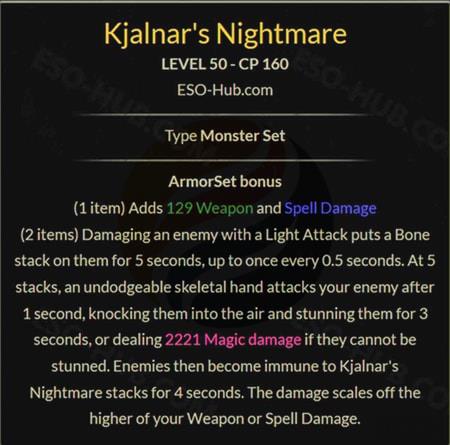
Kjalnar’s Nightmare establishes itself as premier equipment for concentrated single-target damage applications. To activate the skeletal hand projectile, players must successfully execute Light Attacks against targets to accumulate Bone stacks. Upon reaching five stacks, the set discharges its effect, rendering the enemy temporarily immune to additional Bone stack accumulation for four seconds. This limitation means only one group member can effectively utilize its benefits simultaneously.
Strategic Insight: Coordinate with your group to ensure only one damage dealer employs Kjalnar’s Nightmare to prevent overlapping immunities and maximize collective damage output.
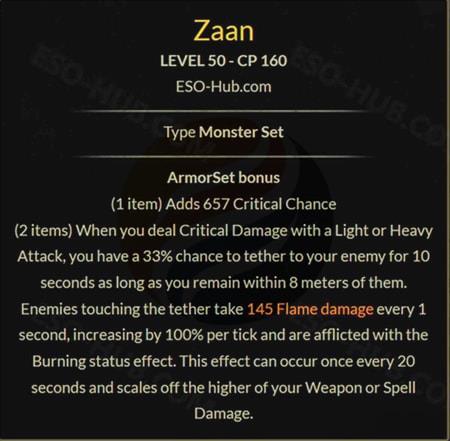
Zaan currently maintains its position as the most frequently selected Monster set for engagements where maintaining consistent tether connection proves feasible. The activation mechanism demonstrates moderate reliability: Initial Critical Strikes from Light or Heavy Attacks create opportunities for subsequent 33% proc chances. Throughout extended combat encounters, statistical probability ensures consistent performance results.
The 8-meter tether requirement combined with the 10-second ramp-up period to achieve peak damage intervals creates vulnerability windows. Unfortunate beam activation timing can significantly diminish effectiveness.
Despite delivering substantial flame damage, Zaan belongs to the exclusive category of sets incapable of scoring critical strikes. However, the base damage values are calibrated exceptionally high, ensuring respectable performance when achieving full duration and maximum damage ticks. However, raw damage alone doesn’t explain its widespread adoption. The combination of direct damage and guaranteed burning effects accompanying each damage pulse elevates it to elite status.
Recent updates have expanded Zaan’s functionality to include damage application against dragon enemies in Sunspire and the concluding encounter in Dreadsail Reef, Taleria.
Zaan additionally inflicts area-of-effect damage to any entities contacting the tether beam, implementing changes introduced during the High Isle Update. Consequently, when additional adversaries intersect the tether pathway, players can generate supplementary AoE damage through this set.
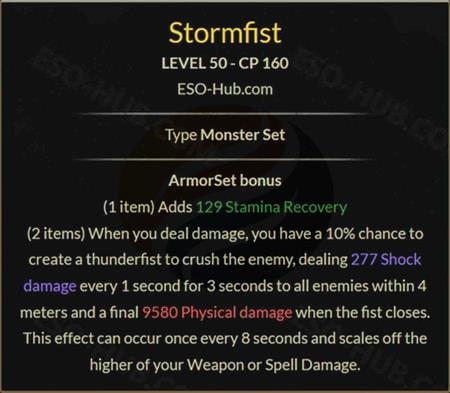
Stormfist features straightforward activation parameters: 10% probability on any damage source, complemented by an 8-second Cooldown, ensuring frequent activation cycles. Stormfist delivers the most potent individual proc among all monster sets regarding pure damage-per-second potential. The combined shock and physical damage components produce impressive results.
Stormfist presents certain limitations requiring consideration. Primarily, the one-piece bonus provides Stamina Recovery. This represents a minor damage sacrifice compared to alternative options. Against sets featuring Magicka or Stamina attributes, the difference remains negligible. However, compared to options with critical chance enhancements, it approximates a 2.5% damage reduction. This factor cannot be disregarded when evaluating the set’s proc damage magnitude. Nevertheless, Stormfist remains a competitive choice, and the Stamina Recovery can provide utility in specific build configurations.
Secondary consideration involves its indiscriminate activation mechanism: Since it triggers from any damage dealt, frequent scenarios occur where it activates from Damage-over-Time effects on secondary targets positioned outside primary engagement zones, resulting in wasted procs on peripheral adds that would succumb to cleave damage. However, when reliably activating on primary targets, its impact proves devastating.
Stormfist incorporates a 4-meter radius for area-effect damage, positioning it as a hybrid solution bridging single-target and AoE damage categories.

Balorgh operates through distinctive mechanics. At 500 Ultimate expenditure, players receive 500 Weapon and Spell Damage, accompanied by 11,500 Penetration, with these benefits persisting for 12 seconds. This configuration excels in short-duration burst scenarios encompassing both area-effect and single-target applications.
500 Ultimate = 500 Weapon/Spell Damage + 11,500 Penetration for 12 seconds
However, the set necessitates accumulating 500 Ultimate to maximize its potential, with benefits lasting only 12 seconds, necessitating careful encounter timing as effectiveness diminishes rapidly following the initial activation period.
Even at 250 Ultimate expenditure, players still obtain 250 Weapon and Spell Damage plus 5,750 Penetration. Ideally, players should build Ultimate reserves as extensively as possible before deployment.
Balorgh synergizes effectively with Mechanical Acuity and complete Medium armor configurations for specific encounters requiring rapid target elimination:
1. Mechanical Acuity provides comprehensive Critical Chance coverage for limited durations
2. Medium armor not only delivers substantial Critical Damage enhancements but additionally amplifies the Weapon and Spell Damage acquired from Balorgh.
3. Players avoid requiring Penetration from Light armor since Balorgh addresses this requirement comprehensively.
These elements combine to create formidable combinations, particularly when multiple group members employ this strategy. Challenging additional enemy waves become completely annihilated.
Domihaus (Falkreath Hold)

Domihaus primarily serves engagements against large-scale bosses, enabling players to position themselves within the damage ring to benefit from personal Weapon and Spell Damage bonuses while the ring damages the primary target.
Grothdarr (Vaults of Madness)
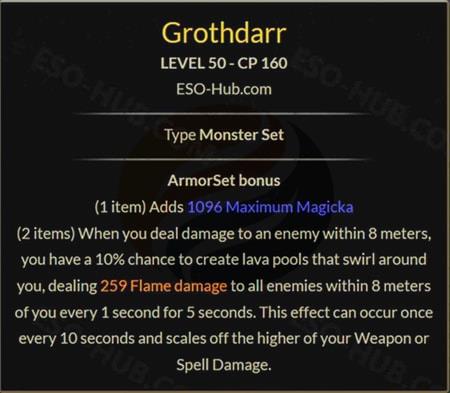
Grothdarr finds application in extremely brief burst area-effect scenarios. Its effects persist for only 5 seconds before initiating a 5-second Cooldown period.
Ilambris (Crypt of Hearts I)

Ilambris shares similar challenges with Stormfist: Activation doesn’t consistently occur at optimal locations. However, it delivers respectable damage-per-second performance when activating in advantageous positions.
Domihaus, Grothdarr, and Ilambris don’t match the performance levels of the previously discussed 12 sets, but remain competent options for damage-focused builds. Notably, these three sets all receive amplification from the Elf Bane set. Consequently, when experimenting with innovative Elf Bane combinations, these sets gain additional benefits through unique interactions.
Action Checklist
- Evaluate your primary damage focus: single-target vs. AoE scenarios
- Coordinate with group members to avoid overlapping set effects like Kjalnar’s Nightmare
- Master positioning requirements for sets like Zaan and Velidreth
- Practice Ultimate management for Balorgh optimization
No reproduction without permission:GameCDjnh » Best Monster Sets for DPS in ESO – Firesong Expert analysis of top ESO Monster Sets for DPS builds with strategic implementation tips