TL;DR
- Position alliances A-west, B-middle, C-east with light parties split for optimal coverage
- Master Grim Embrace by watching crystal animation – pull means forward, push means backward movement
- Phase 2 requires precise tile management with 43-second limits and outer platform coordination
- Use knockback resistance strategically for Aero/Death mechanics
- Tank LB3 is essential for tower failures in later phases
The Cloud of Darkness (Chaotic) Alliance raid arrived in Final Fantasy XIV through Patch 7.15 on December 24, 2024, presenting one of the most demanding 24-player challenges in the current expansion. This high-end encounter pits coordinated teams against an empowered version of the classic antagonist, requiring precise execution of complex mechanics across multiple phases. Successful completion grants access to coveted rewards including Clouddark Armor sets, Clouddark Demimateria crafting materials, and exclusive cosmetic items such as the Shroud of Darkness mount and unique hairstyles.
Content creator Mrhappy has provided comprehensive visual guidance through his YouTube channel, offering detailed breakdowns of each mechanic sequence. For players seeking accelerated progression, professional FF14 Alliance Raid boosting services from MmoGah offer an alternative path to acquisition, potentially securing all rewards within a single day.
Establish clear positioning from the outset: Alliance A occupies the western sector, B maintains central control, and C secures the eastern flank. Each alliance should further organize into light parties for distributed responsibility. At engagement initiation, ensure each alliance has at least one tank holding primary aggro to manage incoming damage distribution.
The boss immediately executes Blade of Darkness, which manifests in three distinct patterns based on her arm positioning. When both arms extend forward, anticipate a massive point-blank area-of-effect requiring immediate evacuation from the central impact zone. If she elevates a single arm, identify the opposite limb as your sanctuary zone – this creates a safe donut formation immediately adjacent to the raised arm. Position yourself near the arm closest to the ground level for optimal safety.
Following two Blade of Darkness sequences, she channels Deluge of Darkness, unleashing raid-wide damage combined with a stacking bleed effect while simultaneously transforming the battlefield geometry. Apply coordinated mitigation to reduce bleed tick damage severity.
After several auto-attack sequences, Cloud of Darkness casts Grim Embrace twice consecutively, each instance tethering twelve players with a lethal Embrace debuff. Upon expiration, this affliction summons a spectral hand that projects from the afflicted player, attempting to inflict both damage reduction stacks and a five-second doom countdown that proves fatal if not cleansed promptly.
The hand’s directional projection – either forward along the player’s facing or rearward – is determined by Cloud of Darkness’s animation during the cast. When she pulls the crystal toward herself, the hand emerges behind the target, necessitating forward movement to escape the area-of-effect. Conversely, if she pushes the crystal away, the hand materializes in front, requiring a backward step to safety. This visual cue is critical for proper positioning response.
As your debuff approaches expiration, optimally direct the hand outside the arena boundaries or at minimum distance from other party members. Execute a minimal adjustment step backward or forward precisely as the timer reaches zero to avoid collateral damage.
During debuff resolution phases, Cloud of Darkness initiates one of two mechanical patterns correlated with Grim Embrace timer assignments. She first summons multiple cloudlets along the rear perimeter that discharge four sequential line area-of-effect patterns requiring precise dodging maneuvers. Position yourself by observing the room’s posterior section, aligning just beyond the initial two line indicators, then transitioning into the vacated spaces as they materialize. Following the second positional adjustment, you achieve safety until all four line sequences complete.
Simultaneously with cloudlet activity, she begins channeling one of three devastating spells: Death, Aero, or Flare.
- Death generates a powerful central pull effect drawing players inward before detonating a doom-inflicting area-of-effect. Immediately after the center explosion, the safe zone transforms into a donut formation – enter this area promptly post-detonation
- Aero strikes the platform center with catastrophic area damage, typically lethal to those caught within. This also applies substantial knockback, so position similarly to Death preparation and utilize the force to return to safety. Knockback resistance proves effective for both Aero and Death mechanics, but conserve this resource for later critical phases
- Flare marks one player per alliance with a high-damage indicator. These impacts deliver extreme damage, necessitating robust mitigation and maximum distance between marked individuals and other party members. Alliance A’s designated Flare carrier should proceed leftward, B toward the rear, and C rightward
Post-Flare detonation, each alliance receives two light party stack markers – maintain your previously established light party formations. Alliance A’s groups orient left, B maintains central or rear positioning, and C’s units shift rightward. A subsequent Blade of Darkness occurs immediately after Flare resolution, requiring appropriate response based on arm positioning. Grim Embrace debuffs begin resolving subsequent to this sequence, requiring individual responsibility for proper execution.
Cloud of Darkness additionally casts either Endeath or Enaero, modifying her subsequent Blade of Darkness execution to include immediate Death or Aero follow-up. Creating alliance macros for this mechanic significantly enhances group coordination, though she provides textual indicators in chat – either “Wind abide in my breast” or “Death abide in my breast” – providing additional reminder mechanisms.
When experiencing consecutive debuff timer expirations across three sets, she initiates Break, summoning two ocular entities along the outer edges that petrify any player gazing toward Cloud of Darkness or the eyes upon cast completion. Avert your gaze from all potential petrification sources.
If only one debuff set activates, she employs Rapid Sequence Particle Beam, targeting each alliance with an eight-player split damage line area-of-effect that strikes four times consecutively. This functions as a wild charge mechanism, dealing substantially increased damage to the initial two targets in each alliance line. Position Alliance A left, B central, and C right. Ensure tanks position foremost in their respective alliances with adequate mitigation deployment.
Regardless of pattern selection, the phase concludes similarly with minor timing variations. The Break pattern features Blade of Darkness immediately following Break, then triggering the Endeath or Enaero combination. The Rapid Sequence pattern generates secondary cloudlets while simultaneously beginning Blade of Darkness casting during their active phase, subsequently activating the spell enhancement. This timing proves particularly challenging, so reserve knockback resistance for the concluding spell execution. Crucially, if Death activates, enter the donut after the central explosion; if Aero triggers, avoid central positioning to prevent fatal impact from the initial strike.
As final debuffs and cloudlets resolve, one additional Aero, Death, or Flare occurs. Players then experience Flood of Darkness for raid-wide damage, concluding the initial phase.
Following Flood of Darkness, Cloud of Darkness immediately channels Deluge of Darkness to reconfigure the arena geometry again, simultaneously applying additional bleed effects requiring substantial mitigation preparation.
Upon entering this phase, all tanks should maintain aggro on Cloud of Darkness. She directs auto-attacks toward the four tanks positioned on central platforms; if any perish, exterior tanks absorbing doubled auto-attacks proves preferable to DPS or healers randomly targeted.
For positional assignments, reference Mrhappy’s comprehensive diagram allocating specific locations for every player across all alliances.
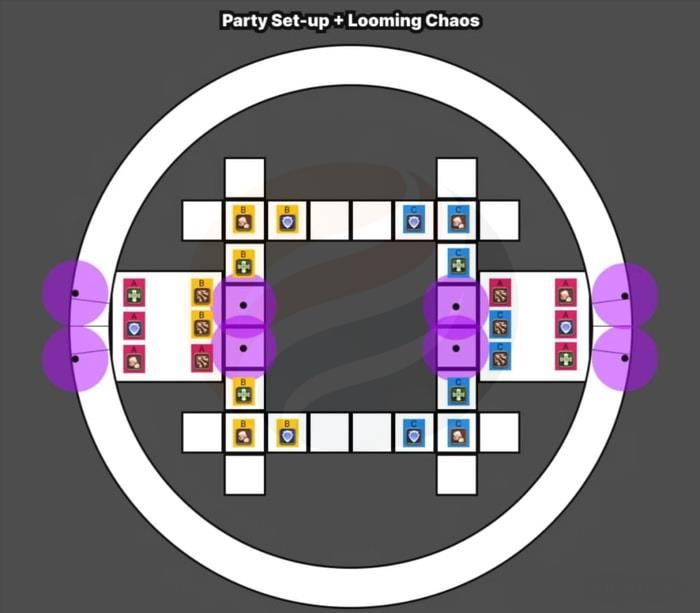
This systematic placement ensures healers maintain effective range coverage across their entire alliances throughout the phase duration while facilitating streamlined assignments and movement across both exterior platforms and PvP tiles in the central area. Note that the six players stationed on outer platforms maintain fixed positions and never engage with PvP tiles due to Looming Chaos swap mechanics. When accommodating players struggling with PvP mechanics or guiding first-time participants for bonus rewards, consider assigning them these six permanent exterior positions.
While Deluge of Darkness channels, initiate positioning according to the diagram. Melee combatants remaining on outer platforms may position proximally to Cloud of Darkness initially, then transition to their designated sides using the outer rings post-cast. Once Deluge of Darkness completes, only players occupying center tiles can directly damage Cloud of Darkness. Exterior platform participants instead engage two Stygians of Darkness – fortunately, all damage inflicted upon Stygians transfers to Cloud of Darkness at phase conclusion.
Center tiles support only one player simultaneously. Dual occupancy instantly destroys the tile, resulting in fatal descent. Additionally, no player may occupy the same tile beyond approximately 43 seconds before structural failure occurs. Regularly refresh tile occupancy between major mechanical sequences and monitor ally reset procedures.
Exterior platform players must periodically manage four Atomos spawning in intercardinal positions. These entities quickly tether to players, dealing massive damage-over-time while eventually initiating healing effects on Cloud of Darkness herself. Assign ranged specialists to eliminate respawning Atomos with minimal global cooldown usage. The Atomos leave residual puddles that, when contacted, teleport the player to the telegraph’s location after six seconds. Interior players who die and resurrect on exterior platforms can utilize these puddles to return centrally. Outer ring participants should avoid these teleportation zones during mechanics requiring proximal navigation.
Cloud of Darkness then casts Dark Dominion, inflicting heavy raid-wide damage while transforming the outer ring into hazardous territory applying potent bleed effects to trespassers. Ensure player health stabilization post-phase transition and after bleed application.
Both Stygians execute Third Art of Darkness, featuring two half-platform area-of-effects combined with either line area spread or partner proximity mechanics. The half-room designations activate when specific tentacles illuminate – partner proximity activates with bilateral illumination, while line spread triggers with singular bodily lighting. While half-platform and line spread mechanics remain relatively straightforward, crucially note that partner proximity effects are distance-baited. The three closest players each bait a paired area-of-effect. Ensure non-baiters maintain distance from baiting players to prevent overlapping damage or ineffective baiting due to excessive range.
Immediately following Third Art of Darkness resolution, Particle Concentration activates, summoning towers requiring player occupancy on both exterior platforms and PvP tiles. For outer platforms, coordinate three players per tower. Interior platforms require all three players to form a compact triangular formation with two positioned nearer cardinals and one central. One exterior player begins in a functional tile and may maintain position. The corner tile assumes the outermost tower position with the remaining player completing the formation. Any unoccupied tower triggers raid-wide damage affecting all 24 players, applying stacking vulnerability debuffs. Single tower failures remain manageable, but multiple failures exponentially increase difficulty. If tower failures appear inevitable, consider deploying tank Limit Break before impact.
Subsequently, Cloud of Darkness executes Ghastly Gloom, manifesting either donut area-of-effect or cross pattern impacting all areas. Donut mechanics require tile players to enter her hitbox while platform players approach the central platform edge. This designation appears through cloud formations creating a circumferential ring around her hitbox.
For cross area-of-effect patterns, visual indicators show multiple clouds encircling her, with tile players identifying three safe zones per corner. Optimally, have one player claim an exterior square pre-mechanic initiation with established movement priority for the remaining two. Expedited positioning for these secondary players provides additional preparation time for the third participant. Exterior platform players should navigate adjacent to Atomos circles along the outer ring, now accessible following Dark Dominion clearance.
The Atomos respawn while the Stygian channels Curse of Darkness, applying multiple timed debuffs to exterior platform players. Upon expiration, the afflicted player discharges a conical area-of-effect in their facing direction, damaging and applying damage-over-time to affected targets. Maintain timer awareness and orient outward as expiration approaches. In practice, one debuff typically expires almost immediately post-application, necessitating prompt verification.
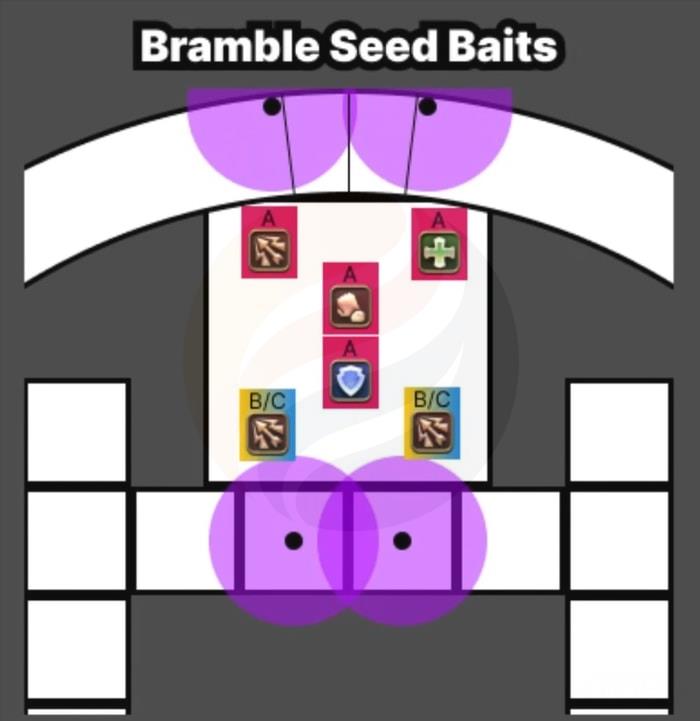
Evil Seed places eight seed markers over players distributed throughout the room. Two players on each exterior platform receive markers alongside four tile players, with no more than two per corner. Reference the previously displayed diagram for final positioning of each seed placement. Interior players must facilitate seed carrier passage to eastern and western interior positions. With dual seeds in one corner, optimally allow the easternmost or westernmost player to proceed first toward the farther position, with the second player following to the closer location.
Once area-of-effects materialize, both players should sprint back to their platform positions within the same corner. Ensure the farther-positioned player moderates velocity to avoid eliminating the forward player, while the less mobile participant clears the pathway. Remember that any platform hosting a seed counts as occupied territory. Maintaining precise seed placement exclusively on the four designated platforms preserves movement flexibility – deviation nearly guarantees subsequent complications. This immediately precedes Ghastly Gloom execution of the alternate pattern from the initial instance.
When Stigan Shadows begin casting Thorny Vine, designate eight players positioned maximally proximal to vine area-of-effects, marking them as tether recipients for respective vines. Upon receiving the vine debuff and establishing tether connection, they can sprint away to sever the connection. As illustrated, all eight vines are managed by exterior platform participants. Navigate opposite directions along the outer ring for successful disconnection.
For interior tile players, two sets of paired players tether together – one northern, one southern tile occupant. They must initiate closely positioned then traverse across tiles until vine separation occurs. During Thorny Vine casting, have all three players in a corner cluster tightly. If two become targeted, maintain proximity until tether formation, then have the farther tile occupant commence crossing movement. Prepare for potential positional adjustments allowing player passage, potentially requiring shift to half-bramble covered tiles to maintain center tile accessibility.
Action Checklist
- Establish alliance positions: A-west, B-middle, C-east with light party splits
- Monitor Blade of Darkness arm positions for safe zone determination
- Execute Grim Embrace based on crystal animation – pull=forward, push=backward
- Coordinate Death/Aero/Flare responses with proper positioning
- Manage Phase 2 tile occupancy with 43-second refresh cycles
- Control Atomos spawns with ranged DPS priority targeting
- Prepare tank LB3 for tower failure scenarios in later phases
No reproduction without permission:GameCDjnh » A Guide to FFXIV Cloud of Darkness (Chaotic) Alliance Raid Master the Cloud of Darkness (Chaotic) raid with expert positioning, mechanics breakdown, and optimization strategies