TL;DR
- Start with Silverbranch and transition to Hollow Palm after Act 1 for maximum speed
- Follow precise gem replacement schedule based on tree progression and item acquisition
- Manage mana reservation efficiency to fit Grace and other essential auras
- Use specific gear progression through acts with key upgrade timings
- Endgame setup allows smooth mapping while preparing for final respec
Welcome, exiles! This comprehensive guide breaks down Fyre’s optimized Path of Exile 3.17 twink leveling strategy using the powerful Hollow Palm technique. Whether you’re racing to endgame or optimizing your leveling process, this approach will dramatically reduce your campaign completion time.
Twink leveling refers to using pre-planned gear and strategies to maximize efficiency during the leveling process. Unlike traditional approaches that rely on found items, twinking leverages carefully selected equipment that provides maximum power at minimal level requirements.
The Hollow Palm technique centers around the “One with Nothing” unique jewel, which grants massive damage scaling based on your dexterity while preventing you from using weapons or gloves. This creates an incredibly powerful unarmed combat style that excels at clearing content quickly.

Campaign Progression Notes
Initial Setup and Early Act Progression
Begin your journey equipped with Silverbranch bow, which provides excellent early game damage scaling. Your primary clearing skill should be Caustic Arrow supported by Mirage Archer, Volley, Onslaught, Chance to Poison, and Pierce support gems.
Critical early game tip: Socket Puncture with Chance to Poison in your Silverbranch specifically for the Brutus encounter. This single-target setup will significantly speed up this challenging early boss fight.
Act 1 Transition to Hollow Palm
Upon reaching the end of Act 1, acquire the Hollow Palm jewel to defeat Merveil efficiently. Switch to using Smite as your main skill, supported by Ancestral Call, Ruthless, Added Fire, Maim, and Onslaught supports.

Common mistake to avoid: Don’t allocate Hollow Palm until you can simultaneously remove all weapons and gloves from your character. The jewel’s power comes from having empty weapon and glove slots.
Strategic Gem Replacement Timeline
- – Smite and Ruthless: These remain core components throughout your leveling journey and should never be replaced.
- – Ancestral Call: Swap for Melee Physical Damage support once you acquire Tribal Fury as an anointment on either Astramentis or Hinekora’s Sight amulets.
- – Added Fire Damage: Replace with Elemental Focus after obtaining the Cold Conversion mastery on your passive tree.
- – Maim Support: Transition to Faster Attacks at level 18, then replace Faster Attacks with Trinity support after securing Cold Conversion mastery.
- – Onslaught Gem: Replace with Elemental Damage with Attacks after both acquiring Cold Conversion mastery and obtaining a Silver Flask.
- – Clarity & Herald of Purity: In Act 3, transition to Purity of Elements (or Hatred if you prefer offensive power over defensive utility).
- – Herald of Ash: Replace with Defiance Banner when you integrate Grace into your build setup.
- – Movement Skills: Upgrade from Dash to Flame Dash as soon as you reach the required level threshold.
Advanced optimization: Time your gem swaps to coincide with passive tree progression milestones. The Cold Conversion mastery serves as the primary trigger for multiple gem transitions.
Critical Build Interactions and Planning
- – Precise Technique Keystone: This only functions properly when combined with Hinekora’s Sight amulet. Avoid allocating this passive or equipping the amulet until you can implement both components simultaneously.
- – Mana Reservation Efficiency: Between Acts 5-10, allocate necessary reservation nodes to accommodate Grace. Begin leveling Grace from Act 3 onward to ensure it’s ready when needed.
- – Endgame Transition Philosophy: The mapping configuration isn’t a fully optimized Hollow Palm build. It serves as an extension of your twink character to facilitate leveling through maps, breaches, delve, or heist content, ultimately preparing for respec or optimal 5-way carry benefits.
- – Gear Upgrade Path: The Nomad belt maintains relevance in endgame due to the Strength > Intelligence requirement of Fractal Thoughts helmet.
- – Budget vs Premium Options: While the endgame gear can be upgraded further, the provided setup represents the most cost-effective tested configuration.
- – Body Armor Considerations: Briskwrap and similar armors face socket color limitations. Verify compatibility before committing to alternative chest pieces.
- – Corruption Strategy: 50% Damage Corrupts on Tabula Rasa provide significant early game damage boosts without level requirements.
- – Flasks and Mageblood: Flask passive nodes become optional when leveling with a Mageblood unique belt.
- – Abyssal Jewel Advantage: The low-level setup jewels have no level requirement, making them ideal for twink leveling strategies.
Passive Tree Priority Sequence
- – Secure Hollow Palm jewel allocation first
- – Acquire sources of Life and Mana Leech
- – Focus on Flask effectiveness, Dexterity percentage, Cold Conversion, and Precise Technique
- – Obtain Mana Reservation Efficiency to accommodate Grace
- – Supplement with generic damage and life nodes
The provided passive tree represents a versatile setup that efficiently balances damage and defense. Customize according to your specific class needs and playstyle preferences.
Critical Warning: Remember to reposition your Hollow Palm jewel in Act 3 for optimal pathing efficiency.
Act-by-Act Equipment Evolution
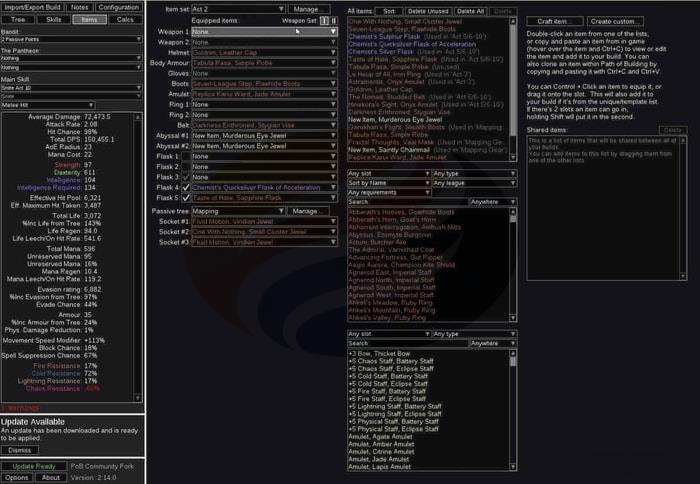
Act 2 Gear Configuration
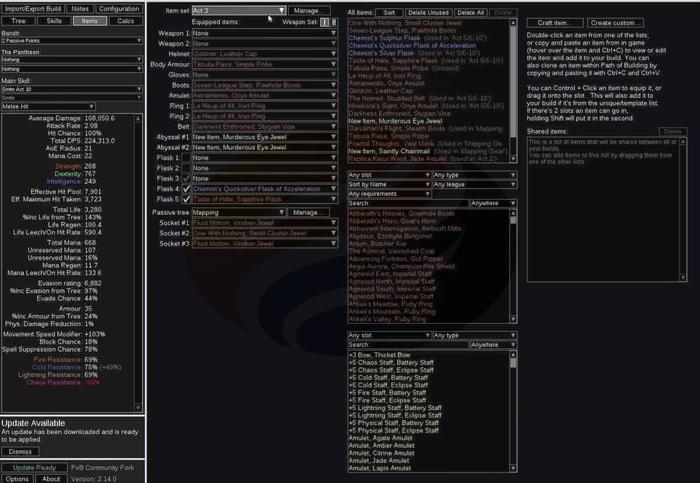
Act 3 Equipment Setup
Acts 5-10 Progression Gear

Strategic insight: The gear progression follows a deliberate path that maximizes power spikes at critical campaign milestones. Each equipment upgrade corresponds to specific content challenges you’ll face.
Common pitfall: Avoid equipping upgrades too early if they have stat requirements you cannot meet. This can cripple your character’s effectiveness.
Final Configuration for Mapping Content
Mapping Equipment Finalization
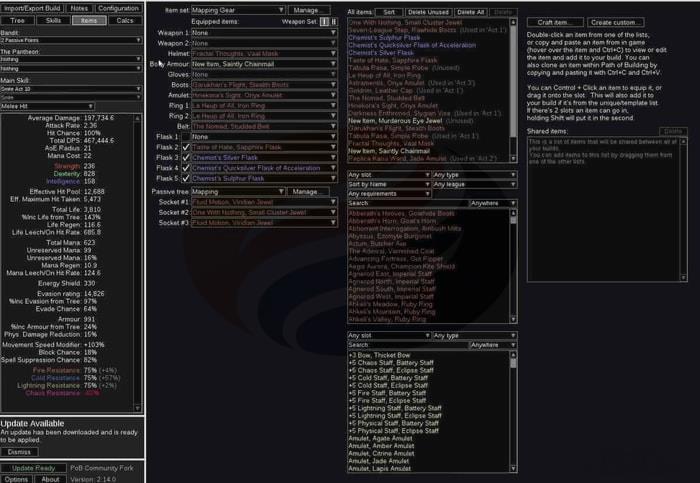
Mapping Passive Tree Configuration

The endgame tree focuses on sustaining your damage output while improving survivability for mapping content. This setup efficiently navigates to essential clusters while maintaining flexibility for class-specific variations.
Alternative options: The Nomad belt can be replaced with a Headhunter for ultimate power, or with higher-level well-rolled abyssal jewels for incremental improvements.
Time estimate: Most players complete the campaign in 4-6 hours using this strategy, with mapping readiness achieved shortly thereafter.
Pro tip: If you’re not immediately ready to respec after Act 10, use the mapping passive tree to chain Blood Aqueduct runs until level 61-64, then transition to maps, breachstones, delve, or heist content to reach optimal 5-way carry levels (typically around level 75).
For those seeking to expand their Path of Exile knowledge, our Class Guide provides additional insights into character specialization strategies that complement this leveling approach.
Action Checklist
- Start character with Silverbranch, Tabula, Goldrim, Seven League Step, Darkness Enthroned with Dexterity abyss jewels
- Configure flasks with Chemist’s/Perpetual prefixes and ‘Used When Charges Reach Full’ instilling orbs
- Transition to Hollow Palm at level 12 after completing Fairgraves/Dweller quests
- Execute gem replacement sequence according to passive tree progression milestones
- Follow act-by-act gear upgrade schedule for optimal power progression
- Transition to mapping setup after Act 10 completion
No reproduction without permission:GameCDjnh » Path of Exile 3.17: Twink Guide Master Path of Exile 3.17 leveling with this comprehensive Hollow Palm twink guide and strategy breakdown