TL;DR
- Install CS2 Workshop Tools via Steam DLC for skin creation access
- Use TGA format files converted from PNG for optimal texture quality
- Navigate Custom Paint Shop to apply designs to weapon models
- Follow Valve’s technical specifications to maximize acceptance chances
- Test thoroughly before submission to ensure visual quality and performance
Within minutes of playing CS2, most players quickly recognize the significant role weapon cosmetics play in the gaming experience. Custom skins serve multiple purposes beyond simple aesthetics—they provide personal expression opportunities and establish visual identity during intense competitive matches.
While purchasing existing skins is straightforward, learning the creation process offers deeper appreciation for the craftsmanship involved. More importantly, mastering skin development can lead to substantial financial rewards when Valve approves your designs for the Steam Workshop marketplace.
This comprehensive guide examines the complete workflow for designing, implementing, and submitting custom CS2 weapon finishes, covering both technical requirements and creative considerations.

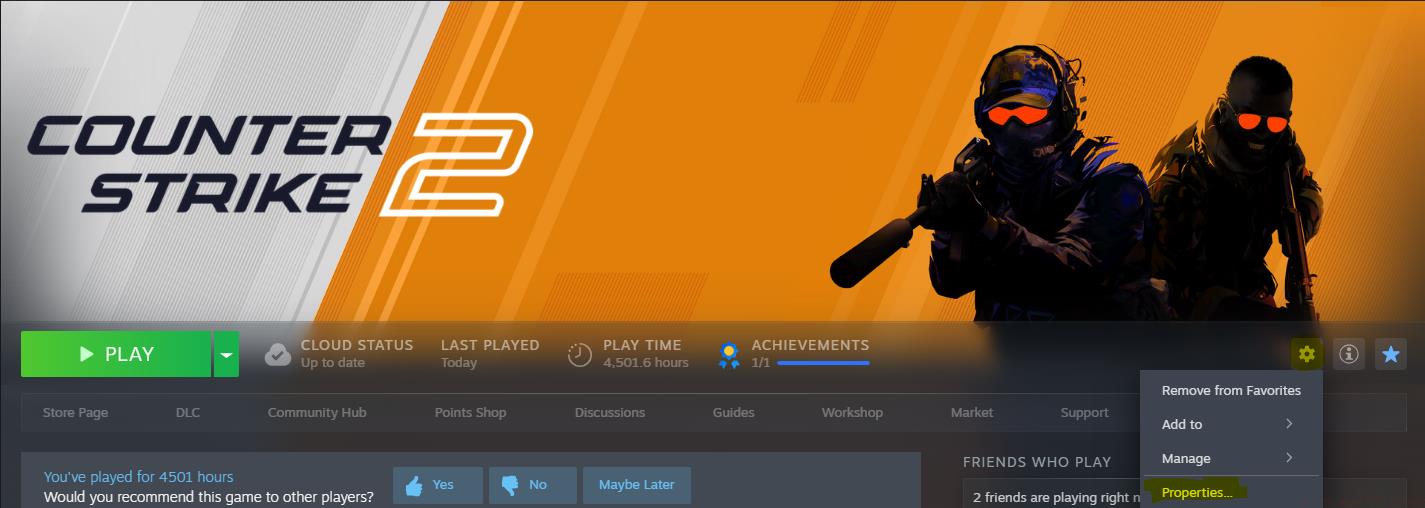
Begin by accessing your Steam Library and locating Counter-Strike 2 in your games list. Identify the gear-shaped settings icon positioned on the right side of the interface and select ‘Properties’ from the dropdown menu that appears.
Navigate to the downloadable content section labeled DLC and activate the checkbox for ‘Counter-Strike 2 Workshop Tools.’ This essential component provides the framework for skin development and testing.
After the download completes fully, initiate CS2 directly through your Steam Library. When presented with launch options, choose “Launch Workshop tools for items” to access the specialized development environment.
Locate the “Custom Paint Shop” folder in the left navigation panel and find the cu_paintkit_example file. Open the AWP sniper rifle model featuring the pre-applied demonstration skin. Activate the “Inspect” function situated in the upper-right corner to view the weapon preview within the game engine.
To implement your custom design, prepare an image file in TGA format, which CS2’s engine processes optimally. Convert standard PNG files using free online conversion tools or professional graphic software like Photoshop or GIMP for higher quality results.
Right-click the texture square, properly align the visual elements, and proceed to the attachment section. Import your TGA image file into the appropriate form field—for demonstration purposes, assume your file carries the designation ‘x.tga’.
Modify the file pathway from the default “items/assets/paintkits/workshop/example_custom_paint.tga” to reference your custom file as “items/assets/paintkits/workshop/x.tga.”

Successful skin creation extends beyond basic implementation. Professional designers recommend establishing consistent color schemes that complement weapon shapes rather than overwhelming them. Consider how your design appears from multiple angles and under various lighting conditions present in CS2’s diverse maps.
Avoid common pitfalls like overly complex patterns that become visual noise during gameplay or designs that negatively impact weapon visibility. Test your skins extensively in different game environments to ensure they maintain visual appeal without compromising functionality.
Optimize file sizes and resolution to balance visual quality with performance—overly detailed textures can cause performance issues on lower-end systems. Study popular accepted Workshop submissions to understand Valve’s quality standards and community preferences.
For comprehensive gaming strategy insights beyond skin creation, explore our Complete Guide to master tactical approaches across different game modes and scenarios.
When preparing weapon-specific designs, reference our Weapons Unlock guide to understand how different firearms function within their respective games, informing your design choices.
Successful skin artists often specialize in particular weapon categories, similar to how players master specific roles outlined in our Class Guide for optimal team composition and gameplay effectiveness.
Action Checklist
- Install Workshop Tools via Steam DLC section
- Convert design files to TGA format using conversion tools
- Navigate Custom Paint Shop and apply textures to weapon models
- Test skin appearance across multiple maps and lighting conditions
- Submit polished design to Steam Workshop following Valve guidelines
No reproduction without permission:GameCDjnh » How To Make CS2 Skins? Master CS2 skin creation with professional techniques, common pitfalls, and step-by-step workflow guidance