Master the unique Bakunawa boss mechanics in Genshin Impact with precise timing strategies and expert combat tips
Understanding the Bakunawa Encounter
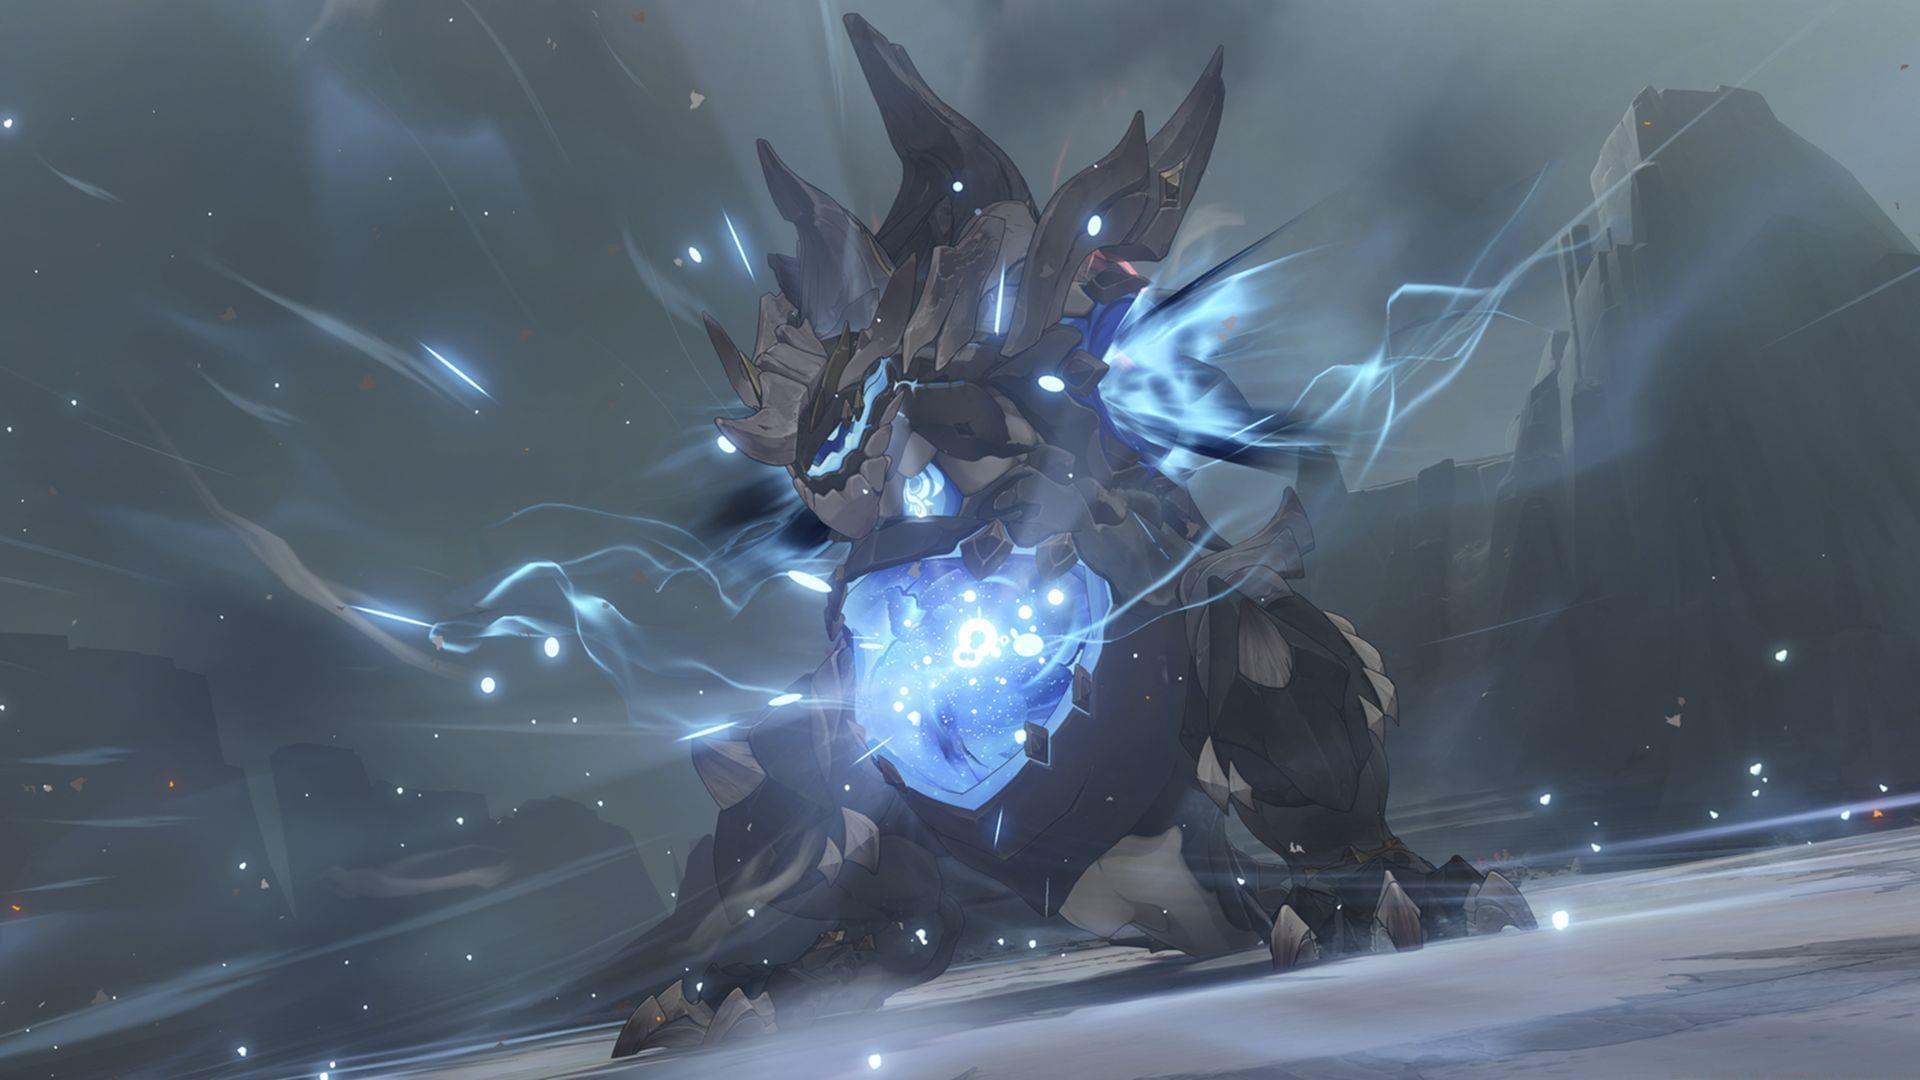
The formidable Bakunawa represents one of Genshin Impact’s most mechanically unique boss encounters, located within the Mare Jivari region of Natlan. Unlike traditional world bosses that provide character ascension materials, this entity serves as the climactic antagonist within The Last Survivor of Tenochtzitoc World Quest at Easybreeze Holiday Resort. Standard combat approaches prove completely ineffective against this celestial serpent – victory demands mastery of the specialized Calamity of Eshu mechanic rather than conventional elemental reactions or weapon attacks.
Understanding the narrative context enhances this encounter’s significance. Bakunawa embodies a crucial story moment rather than a farmable resource node, making proper execution essential for quest progression. The battle design emphasizes mechanical precision over statistical character strength, creating an experience accessible to players regardless of their roster investment level.
Calamity of Eshu: Core Defense Mechanics
Throughout the Bakunawa confrontation, your survival depends entirely on proficient utilization of the Calamity of Eshu ability, which channels Wayob’s protective energies to neutralize incoming assaults. The temporal aspect of this defensive mechanism creates the battle’s primary challenge – the protective barrier persists for merely one second while requiring two seconds to recharge between activations. This narrow timing window demands anticipatory reactions rather than reflexive responses.
Optimal activation occurs during the brief moment when Bakunawa’s attack animations reach their peak intensity immediately before impact. Visual cues like energy gathering around the boss’s maw or specific body movements signal impending attacks. Advanced players should note that the shield possesses brief invincibility frames upon activation, allowing perfectly timed uses to negate multi-hit combinations. Environmental awareness remains crucial since positioning affects both visibility of telegraphing animations and portal placement during phase transitions.
Phase Progression: Arm Severing Strategy
Successfully deflecting Bakunawa’s offensive maneuvers temporarily incapacitates the creature, creating strategic openings for counterattacks. During these stunned intervals, your companion Citlali generates mystical portals adjacent to your position. Transition swiftly through these dimensional gateways and immediately activate the Calamity of Eshu’s offensive capability to severe one of the boss’s limbs. This sequence must be executed twice to disable both arms, with each successful amputation triggering distinct phase transitions.
The boss employs increasingly complex attack patterns between arm-severing opportunities, often combining projectile volleys with area-denial effects. Between portal appearances, maintain consistent defensive timing while monitoring Bakunawa’s behavioral changes. The creature typically introduces new attack variations after losing each arm, including wider area coverage and faster animation sequences. Patiently enduring these intensified assault phases while awaiting the next stunning opportunity forms the core progression loop.
Final Phase: Soulshard Rain Execution
Following the dismemberment of both limbs, Bakunawa initiates its most dangerous phase by gathering cryo energy for a devastating area assault. This critical juncture requires switching from defensive to offensive mechanics – engage the Calamity of Eshu interface to replace your standard Elemental Skill with the Soulshard Rain ability. Maintain pressure on the activation button for several seconds to achieve maximum charge potential before unleashing the empowered attack against the vulnerable boss.
Miscalculating this timing proves catastrophic, as Bakunawa’s fully charged cryo explosion will instantly defeat your active character regardless of health, level, or defensive stats. The charging duration for Soulshard Rain correlates directly with the boss’s own attack windup, creating an intentional rhythm to this exchange. Successful interruption stuns Bakunawa once more, enabling a final portal transition to deliver the conclusive strike that concludes the combat sequence.
Advanced Combat Optimization
Common execution errors include premature shield activation, portal transition delays, and insufficient Soulshard Rain charging. Mitigate these issues by practicing auditory cues – each attack generates distinct sound effects during windup phases. Camera positioning also significantly impacts success rates; maintaining medium distance with the boss centered provides optimal telegraph visibility.
Advanced strategies involve counting attack patterns between stun opportunities. Bakunawa typically executes 3-4 attack sequences before becoming vulnerable again. During the final phase, begin charging Soulshard Rain immediately when cryo particles visibly converge around the boss’s core. Post-completion, extensive narrative sequences unfold, resolving The Last Survivor of Tenochtzitoc storyline while potentially unlocking additional exploration opportunities within Easybreeze Holiday Resort.
Check out our other Genshin Impact guides:
No reproduction without permission:GameCDjnh » How to defeat the Bakunawa in Genshin Impact Master the unique Bakunawa boss mechanics in Genshin Impact with precise timing strategies and expert combat tips