TL;DR
- The Slave Pens is a level 62-64 dungeon requiring specific strategies for each boss encounter
- Heroic mode requires Reservoir Key and reputation farming for optimal efficiency
- Crowd control against humanoids and proper positioning prevents most wipes
- Reputation optimization involves clearing non-elite Broken before killing Slave Masters
- Each boss has unique mechanics requiring targeted counter-strategies and preparation
The Slave Pens represents the foundational dungeon experience within Zangarmarsh’s underwater Coilfang Reservoir complex. This instance accommodates players from levels 62 through 64 in standard mode, while Heroic difficulty becomes available at level 70. Three distinct boss encounters await adventurers: Mennu the Betrayer, Rokmar the Crackler, and Quagmirran, each presenting unique combat challenges.

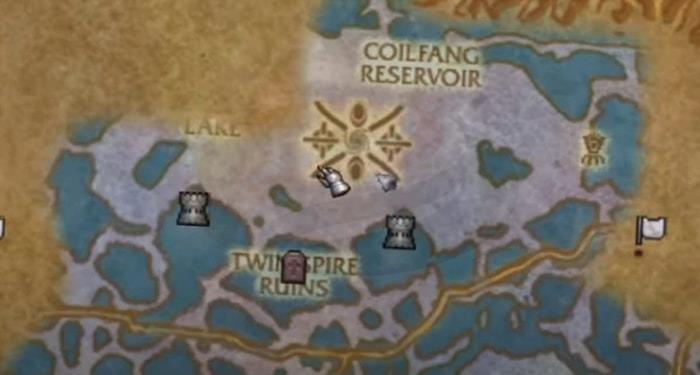
Accessing Heroic difficulty necessitates obtaining the Reservoir Key, which initially requires reputation standing with relevant factions. This requirement later transitions to honor-based acquisition through game updates. The entrance manifests as a colossal pipe structure submerged within the central lake; navigate through its opening to discover a submerged Murloc cavern populated with crustacean inhabitants.
Positioned as the leftmost instance beyond the portal, The Slave Pens presents moderate challenge levels that vary significantly based on party composition. Humanoid adversaries dominate the enemy roster, making crowd control abilities exceptionally valuable. Polymorph, Sap, Seduction, and Mind Control prove particularly effective against these foes.
Mind Control Strategies
Priests should prepare specific Mind Control tactics for Heroic encounters, though standard mode typically permits more straightforward approaches. Initial crab patrols can be circumvented with careful movement rather than direct confrontation.

Stealth approaches prove effective against initial patrols; simply await their patrol pattern, trail behind, and maneuver them toward Slave Master positions. While these crustacean humanoids remain susceptible to various control effects, their lack of ranged attacks enables alternative engagement methods.

Area-of-effect compositions excel here, enabling kite-and-burn methodologies. These adversaries present ideal farming opportunities due to their limited combat capabilities. However, parties lacking substantial AoE potential should implement standard crowd control protocols, particularly noting their armor reduction capabilities. Tanks frequently sustain significant damage, making movement-impairing effects particularly beneficial for maintaining combat control.
Slave Masters summon nearby non-elite Broken (Krokul in Draenei terminology) as reinforcements. Eliminating the Slave Master immediately causes remaining non-elites to flee, though reputation optimization dictates clearing Broken forces first for maximum faction gains.
Patrolling enemies within larger chambers may sometimes be bypassed, though clearing them typically proves more time-efficient while providing additional reputation opportunities.
Coilfang Champions and Coilfang Rays represent the most hazardous standard encounters, frequently causing party wipes through fear effects that pull additional groups. Optimal engagement involves drawing these enemies back into previously cleared corridors to prevent accidental multi-pack pulls.
Mennu the Betrayer
This initial boss patrols stairway areas, requiring strategic engagement planning. Clear the three-enemy group at the ramp base first, pulling them around corners for safety. A subsequent four-enemy formation may be bypassed to engage Mennu the Betrayer directly. Adequate WoW Classic TBC gold reserves ensure access to essential abilities like Lightning Bolt and various totems.

Rokmar the Crackler
As the secondary boss encounter, this bogstrok sovereign commands The Slave Pens domain.
His combat capabilities include:
![]() Enrage – significantly boosts his attack velocity and damage output
Enrage – significantly boosts his attack velocity and damage output
![]() Ensnaring Moss – reduces attack and spellcasting speed
Ensnaring Moss – reduces attack and spellcasting speed
![]() Grievous Wound – inflicts persistent bleeding until complete healing occurs
Grievous Wound – inflicts persistent bleeding until complete healing occurs
![]() Water Spit – unleashes unavoidable frost damage projectiles
Water Spit – unleashes unavoidable frost damage projectiles
Grievous Wound represents his most threatening capability, typically affecting tanks who continue bleeding until receiving full healing. His substantial health pool and frost-based Water Spit attack necessitate defensive measures like ![]() Frost Resistance,
Frost Resistance, ![]() Frost Resistance Aura, and
Frost Resistance Aura, and ![]() Frost Ward.
Frost Ward.
Quagmirran
The culminating boss encounter remains submerged within the final chamber’s aquatic environment. Tanks should initiate combat using ranged attacks to establish threat before drawing him onto dry terrain for the main engagement.
This single-target confrontation involves minimal movement requirements but inflicts substantial tank damage alongside moderate party-wide harm. Positioning dispersion proves crucial; ranged combatants must evade his ![]() Acid Spray ability. Poison removal capabilities and resistance enhancements provide significant advantages throughout this encounter.
Acid Spray ability. Poison removal capabilities and resistance enhancements provide significant advantages throughout this encounter.
For reputation maximization, prioritize eliminating non-elite Broken before dispatching Slave Masters, as this sequencing yields optimal faction gains. The dungeon’s layout permits strategic skipping of certain patrol groups to accelerate clear times, though complete clears remain preferable for reputation farming objectives.
Common failure points typically involve improper handling of Coilfang Champions and Rays, whose fear mechanics frequently pull additional enemy groups. Always establish engagement positions within cleared areas to prevent chain-pulling incidents.
Gear preparation should emphasize frost and poison resistances for specific boss encounters. Consumables like healing potions, resistance scrolls, and mana regeneration items significantly enhance survival probabilities during challenging encounters.
Party composition flexibility proves valuable; while crowd control-heavy groups excel against humanoid enemies, area-effect compositions can achieve comparable efficiency through proper positioning and kiting techniques.
Time investment for complete clears typically ranges from 45-60 minutes for standard groups, with Heroic mode requiring additional preparation and potentially longer completion times depending on party coordination and gear levels.
Some content within this guide references strategic insights from MadSeasonShow’s comprehensive video analysis.
Action Checklist
- Verify party composition includes adequate crowd control capabilities for humanoid enemies
- Obtain Reservoir Key for Heroic mode access through reputation or honor
- Navigate to Coilfang Reservoir entrance via central lake pipe structure
- Implement strategic skipping or clearing of initial crab patrols
- Engage Slave Masters only after clearing non-elite Broken for reputation optimization
- Execute boss-specific counter-strategies and positioning protocols
No reproduction without permission:GameCDjnh » Guide to Heroic Slave Pens in TBC Classic Master The Slave Pens dungeon with expert strategies, boss tactics, and reputation optimization in TBC Classic